The Home Hyper-V Test Lab – On a Budget (Part 3)
Let's start with a very quick re-cap:
Part 1 – Covered the hardware, network configuration and some performance testing.
Part 2 – Covered the storage configuration, cluster configuration and started to talk about the use of differential disks and the CSV block cache.
In Part 3, I'm going to cover the differential disks in much more detail, how they work, why you want to use them in a test lab. I'll also start talking about the automation parts, in this post, focusing on basic VM provisioning.
Differential Disks
The huge performance gains from the CSV block cache described in Part 2 are seen because of a combination of the CSV cache and the use of Differential Disks. Differential Disks work by having a read only copy of a master disk that multiple VMs are attached to. All differences between those VMs are stored in the 'differential' disk attached to the VMs. It's best explained by the high level process used to set it up.
- Create a VM (The VHDX can be fixed or dynamic, does not matter, but for a lab dynamic is a good idea)
- Install the Operating System (MDT comes in handy here, I've got some cool zero touch role deployment stuff using MDT that integrates with VM templates, but that's for another post)
- Patch the Operating System
- Sysprep the Operating System
- Delete the VM (The VHDX file with the patched, syspreped OS will be retained)
- Mark the VHDX file as read only
That's the preparation work. Now you can create a VM using the differential disk. Here are the high level steps
- Create a new differential VHDX linked to the parent disk (created in the previous steps)
- Create the VM and attach the disk created in step 1.
Done! Boot the VM and it will run through its mini-setup. Then you have a new VM with a patched OS. There are two main advantages to doing this. Firstly, rapid provisioning. When using PowerShell to perform VM creation, you can have a new patched VM in minutes (and most of that time is the machine running mini-setup). Secondly, because most OS disk reads for multiple VMs are coming from the same disk, you see huge performance gains from the CSV block cache.
Differential Disk Limitations
You would normally not use differential disks in Production environments (there are exceptions, such as Citrix PVS), and there are several reasons for this.
Resiliency – When you have multiple VMs running of the same master VHDX, the risk profile goes up. If the master disk gets corrupted or accidently deleted, then you don't lose one VM, you lose all the VMs linked to that master. Because of this, it is very important to back up the parent VHDX file to some other storage.
Performance – As all reads are coming from the same disk, that disk will get smashed with read I/O. So you either need to throw very fast disk at it and/or use caching (we're using caching).
Patching Lifecycle – Once the master has been marked read only, you can't patch it. And no, you can't remove the read only tag, patch it and mark it as read only again. Why? Well, the child disk looks at the parent and knows something changed in the parent since it was originally linked, but it can't know what. From that point it simply assumes the parent disk has become corrupted and the VM based off that disk won't start. While it is possible to correct this by reconnecting to the parent drive (and ignoring the ID mismatch). It's not recommended for stability reasons and it's certainly not recommended as a regular patching strategy. While it's tempting to take these kinds of shortcuts in a lab, just remember this. Stability and reliability are critical in a lab. When you're in your lab, you're learning and testing. If something is not working, you want it to be because of something you've done wrong in the configuration, not because you've done something doggy with patching and caused instability in the system. It can also take many, many hours to track down those kind of faults.
The say a picture is worth a thousand words. So I've included an illustration of the makeup of differential disks.
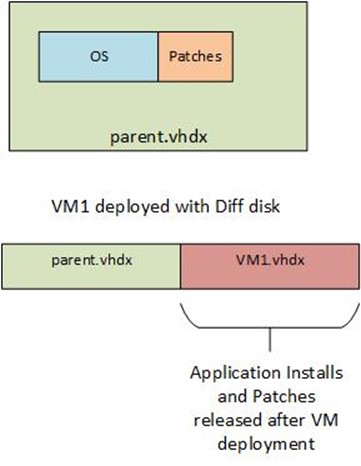
When you deploy the first VMs off the parent, the VMs deploy quickly, because at that point in time they are fully patched. But as time rolls on they become more and more out of date. One of the main reasons to do this is rapid provisioning. So after a while you'll want to create a new set of parent disks that are more up to date.
I've got automation to do this, but that will be the content of another post. In this post I'll cover off the automation for VM provisioning. This first set of automation will be basic and will cover off provisioning with Hyper-V only. In the next post I'll cover off more advanced provisioning using System Centre 2012 SP1 – Virtual Machine Manager.
The key to automation in Windows and System Centre is PowerShell. If you work in IT System Administration you owe it to yourself to know PowerShell and know it well. If you're not sure where to get started with PowerShell, some good places are here, here and here. The last link is to a Virtual Academy course on PowerShell, and it's an excellent way to get started.
Here is the script, and then I'll discuss a few interesting points.
#Ask for Server Name
$MachineName = Read-Host "Please enter the Machine name"
$ParentVHD = "C:\ClusterStorage\Volume1\ParentVHDs\Diff2012_2_disk_1.vhdx"
$DefaultVHDPath = "C:\ClusterStorage\Volume2\"
$VHDXName = $DefaultVHDPath + $MachineName + "_C.vhdx"
#Create new disk from parent
New-VHD -ParentPath $ParentVHD -Path $VHDXName -Differencing
#Create new VM with diff disk
New-VM -VHDPath $VHDXName -Name $MachineName -MemoryStartupBytes 2147483648 -SwitchName "External"
# Set additional VM Config
Set-VMMemory -VMName $MachineName -DynamicMemoryEnabled $true -MaximumBytes 4294967296 -MinimumBytes 536870912
Set-VMProcessor -VMName $MachineName -Count 2
#Add Machine to Failover Cluster
Add-ClusterVirtualMachineRole -VirtualMachine $MachineName
Start-VM -name $MachineName
The first line asks for the server name to be build and stores it in the $MachineName variable. The next three lines set up the paths for the virtual hard drives. Please note the C:\ClusterStorage\Volume1 and C:\ClusterStorage\Volume2 paths. This is the CSV namespace for the clustered volumes, the parent disk stored on volume 1, which is the slower spindle storage and Volume 2 is hosted on the SSD (refer back to Part 2 for details of this setup). The first step of creating the differencing VHDX is done using the New-VHD cmdlet. As you can see from the PowerShell, this is very, very easy to do. The next line creates the VM and attaches the newly created VHDX file. In addition, it sets the startup memory for the VM and attaches it to the 'External' virtual switch. The next two lines set Dynamic Memory on the VM, minimum of 512Mb, maximum of 4GB and gives it two vCPUs. If you leave it there, the VM will be created with the VHDX on the clustered storage, but it will not be highly available because the cluster service is not aware of it. The Add-ClusterVirtualMachineRole command will add the VM to the cluster service. The last line in the script starts the VM.
From here you'll have to do manual steps such as set the machine name in the Operating System (The script set the external VM name, this can be different to the machine name in the OS), the IP address and joining to the lab Domain. In the next post I'll cover off the automation for provisioning using Virtual Machine Manager, which will take care of these manual steps.
Let's see how rapid the provision of a VM is using this method. I want to fire up a new server to do some awesome testing, from entering the server name at the script prompt and pressing enter, my VM is booted and ready for work in 2 minutes and 21 seconds. This includes running mini-setup. In fact the mini-setup takes most of the time as the VM is provisioned, added to the cluster and booting after about 20 seconds.
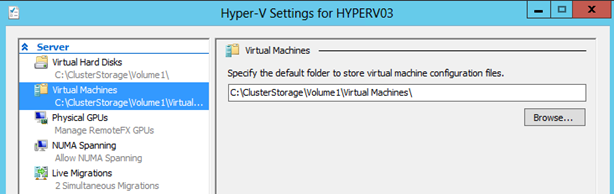
Oh, I almost forgot to mention, make sure you have the CSV namespace set as the default path for the Virtual Machines in Hyper-V Settings. If you don't the script will place the VM configuration on the host's local hard drive and not the clustered storage (that's the config files, not the VHDX files). Everything will seem OK from the Hyper-V and Cluster Manager UI, but you'll notice the problem soon enough the first time you try and Live Migrate a VM.