Running ACS-Engine in Docker container
This sprint I've been busy with the implementation of running Kubernetes in Azure.
What is Kubernetes?
Kubernetes is an open-source platform designed to automate deploying, scaling, and operating application containers.
With Kubernetes, you are able to quickly and efficiently respond to customer demand:
- Deploy your applications quickly and predictably.
- Scale your applications on the fly.
- Roll out new features seamlessly.
- Limit hardware usage to required resources only.
Kubernetes on Azure
Azure Container Service (ACS) allows you to quickly deploy a production ready Kubernetes cluster.
ACS for Kubernetes makes it simple to create, configure, and manage a cluster of virtual machines that are preconfigured to run containerized applications.
Remark: Azure Container Service (AKS) is being updated to add new deployment options, enhanced management capabilities, and cost benefit to Kubernetes on Azure. Visit the AKS documentation to start working with these preview features.
What is the difference between ACS and AKS?
ACS is our current Azure Container Service, which is the unmanaged version compaired to the managed version of Azure Container Service (AKS).
By using AKS, you can take advantage of the enterprise-grade features of Azure, while still maintaining application portability through Kubernetes and the Docker image format.
Managed Kubernetes in Azure
AKS reduces the complexity and operational overhead of managing a Kubernetes cluster by offloading much of that responsibility to Azure. As a hosted Kubernetes service, Azure handles critical tasks like health monitoring and maintenance for you. In addition, you pay only for the agent nodes within your clusters, not for the masters. As a managed Kubernetes service, AKS provides:
- Automated Kubernetes version upgrades and patching
- Easy cluster scaling
- Self-healing hosted control plane (masters)
- Cost savings - pay only for running agent pool nodes
With Azure handling the management of the nodes in your AKS cluster, you no longer need to perform many tasks manually, like cluster upgrades. Because Azure handles these critical maintenance tasks for you, AKS does not provide direct access (such as with SSH) to the cluster.
Deployment options AKS
You can deploy AKS via the following options:
- Azure CLI
- Azure Portal (search the Marketplace for Azure Container Service)
- ACS-Engine
ACS-Engine
Because we needed more control over the Azure Resource Manager templates, we used the open source acs-engine project to build our own custom Kubernetes cluster and deploy it via PowerShell.
The Azure Container Service Engine (acs-engine) generates ARM (Azure Resource Manager) templates for Docker enabled clusters on Microsoft Azure with your choice of DC/OS, Kubernetes, Swarm Mode, or Swarm orchestrators. The input to the tool is a cluster definition. The cluster definition is very similar to (in many cases the same as) the ARM template syntax used to deploy a Microsoft Azure Container Service cluster.
And now we are getting close to the title of this blog post.
The default installation option for the ACS-Engine is the following:
Download the latest version of acs-engine for here. Download acs-engine for your operating system. Extract the binary and copy it to your $PATH.
But my collegue Alessandro Vozza created a Docker file and Image for the ASC-Engine. Which makes it so easy to use the ACS-Engine tool.
Running ASC-Engine in Docker for Windows
To get the ASC-Engine running in Docker for Windows you need to do the following:
- Install Docker for Windows
- Configure a Shared Drive in Docker for Windows.
- Pull Docker image ams0/acs-engine-light-autobuild from Docker Hub
- Create a ACS-Engine Cluster Definition file
- Run the ASC-Engine Docker instance and generate ARM (Azure Resource Manager) templates from Cluster definition input.
- Deploy Kubernetes Cluster to Azure via PowerShell or Azure CLI.
Step 1. Install Docker for Windows
Just follow the steps described here to install Docker for Windows.
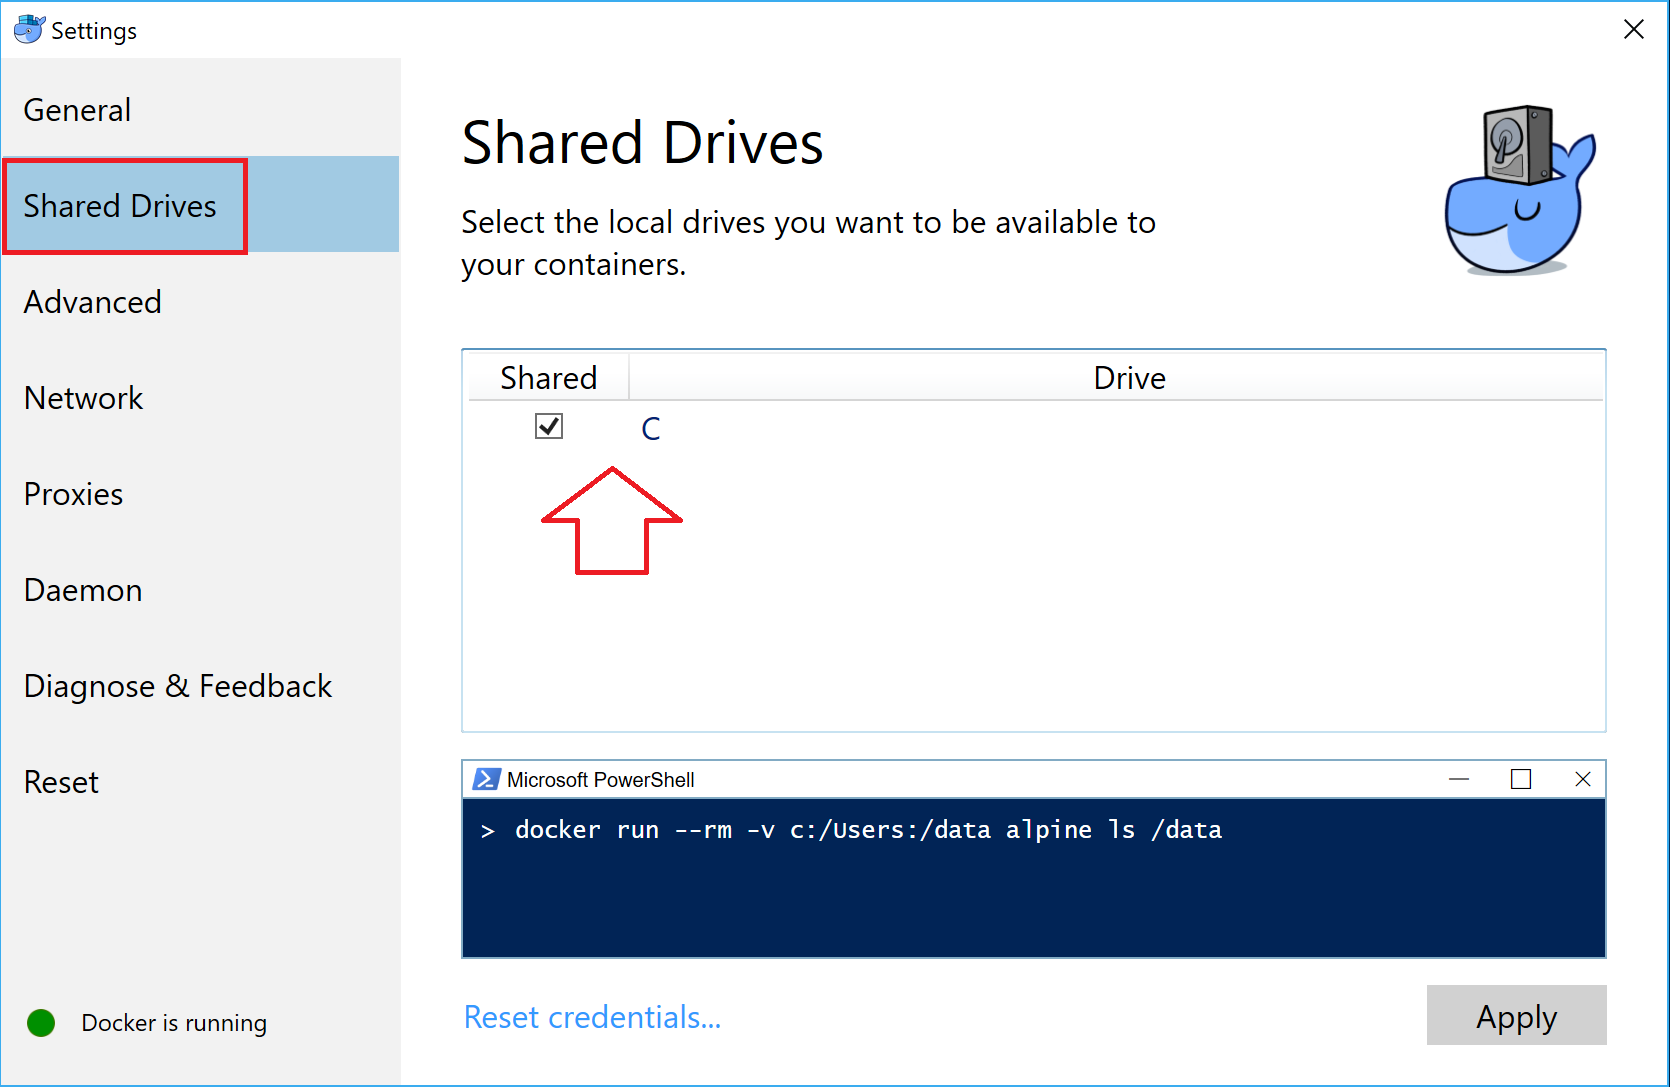
Step 2. Configure a Shared Drive in Docker for Windows
Because we are going to create and edit the ACS-Engine Cluster definition on our Windows machine we need to make sure we can access this file from within the Docker Engine on Windows.
Open the setting of the Docker for Windows Client and configure the Shared Drive.
Step 3. Pull Docker image ams0/acs-engine-light-autobuild from Docker Hub
Open your favorite shell (PowerShell Core?) and type the following:
docker pull ams0/acs-engine-light-autobuild
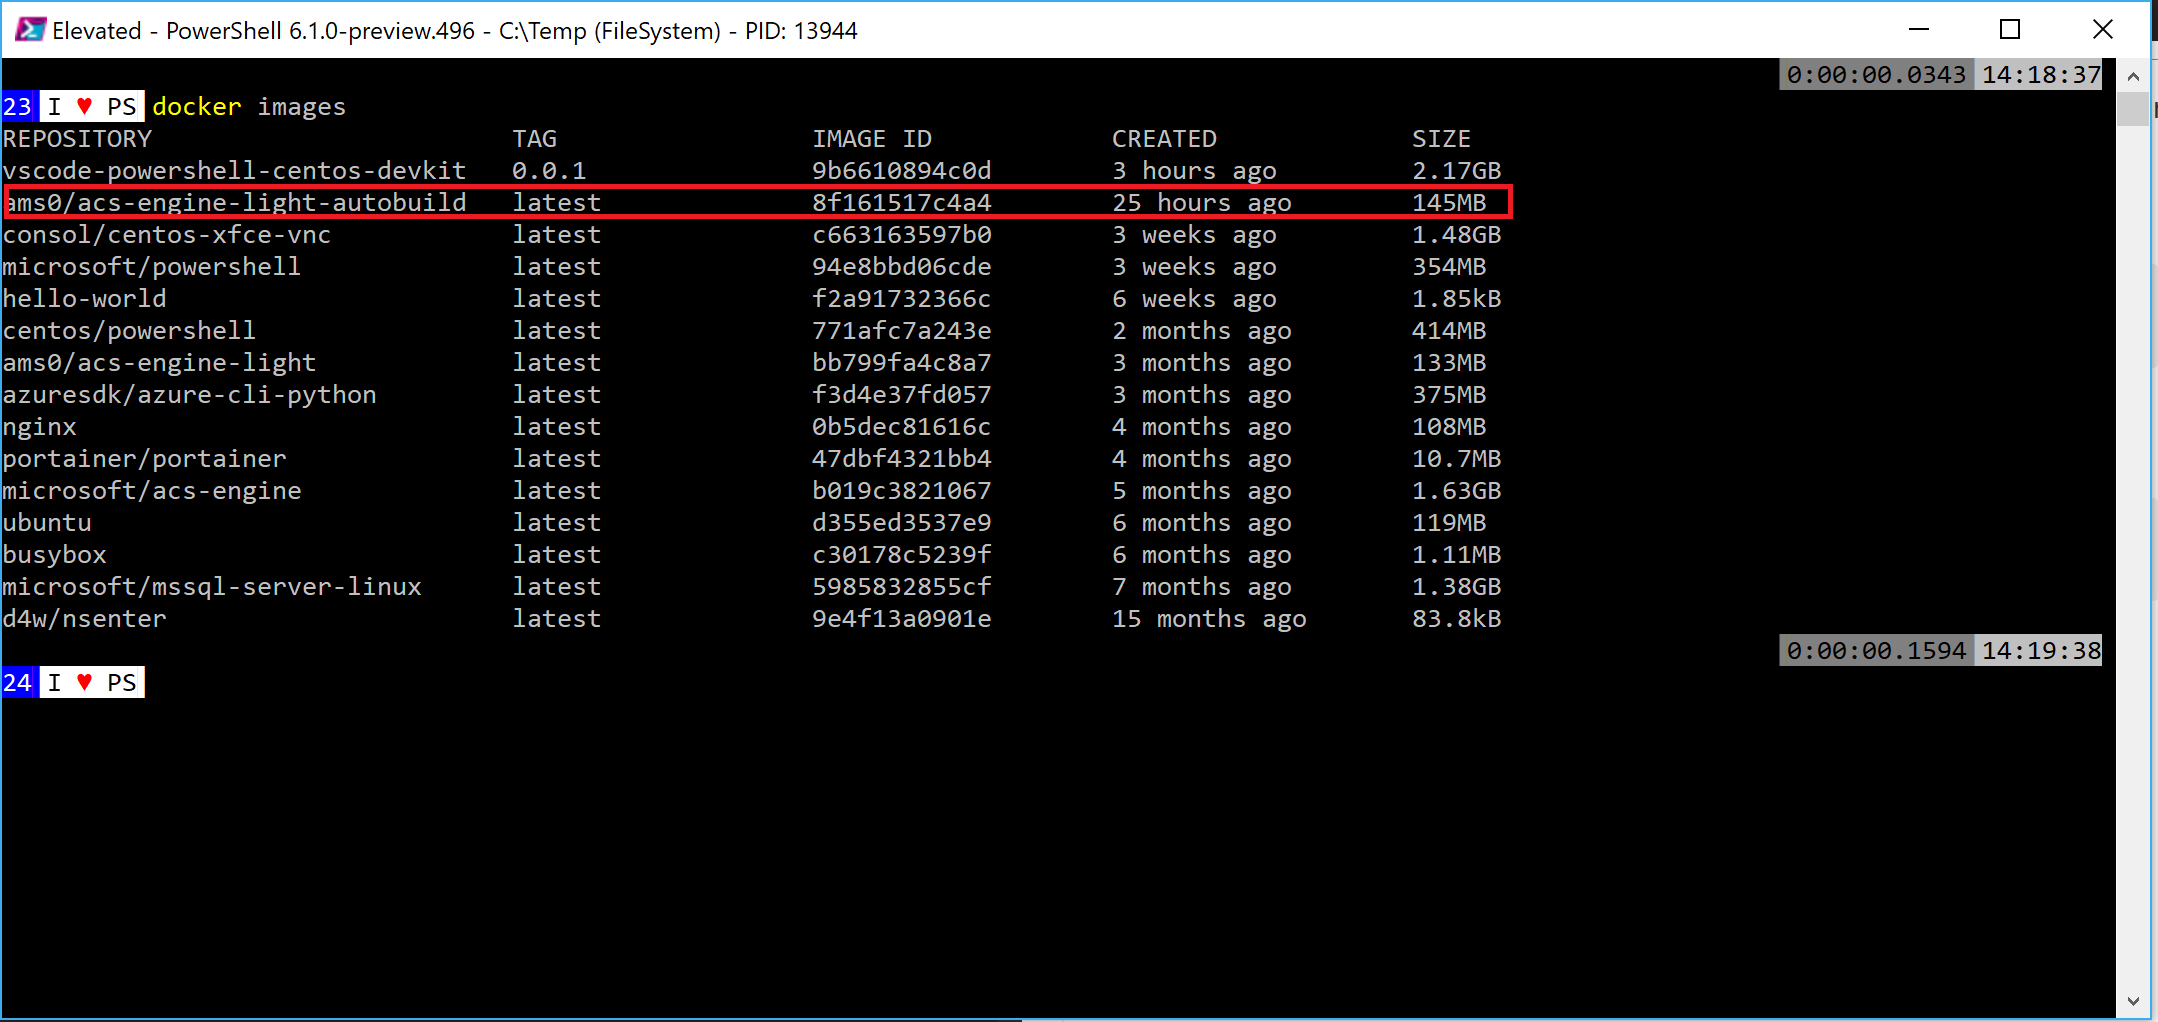
You can verify the Docker image download by running the following command:
docker images
Step 4. Create a ACS-Engine Cluster Definition file
Open your favorite editor (VSCode) and create a Cluster Definition file and store that file on the Docker Shared Drive.
You can find some examples of Cluster Definition files on the Github page.
For more detailed configuration of your Cluster Definition have a look at the Cluster Definition documentation on Github.
Empty example of a kubernetes.json Cluster Definition file:
 {
  "apiVersion": "vlabs",
  "properties": {
    "orchestratorProfile": {
      "orchestratorType": "Kubernetes"
    },
    "masterProfile": {
      "count": 1,
      "dnsPrefix": "",
      "vmSize": "Standard_D2_v2"
    },
    "agentPoolProfiles": [
      {
        "name": "agentpool1",
        "count": 3,
        "vmSize": "Standard_D2_v2",
        "availabilityProfile": "AvailabilitySet"
      }
    ],
    "linuxProfile": {
      "adminUsername": "azureuser",
      "ssh": {
        "publicKeys": [
          {
            "keyData": ""
          }
        ]
      }
    },
    "servicePrincipalProfile": {
      "clientId": "",
      "secret": ""
    }
  }
}
Step 5. Run the ASC-Engine Docker instance and generate ARM (Azure Resource Manager) templates from Cluster definition input
Go back to the shell where you have docker running.
Start Docker Container asc-engine with attached drive where kubernetes.json file is stored. Output is stored in c:\temp\_output folder
docker run -it --rm -v c:/Temp:/acs -w /acs ams0/acs-engine-light-autobuild:latest /acs-engine generate kubernetes.json
You should now see all kinds of files being created in the output folder of the ACS-Engine.

Step 6. Deploy Kubernetes Cluster to Azure via PowerShell or Azure CLI.
The final step is to deploy the ARM Templates created in the output folder from step 5.
If you use PowerShell you can do the following:
 #region Variables
$ResourceGroupName = '[configure resource group name for Kubernetes Cluster]'
$Location = '[configure Azure Location]'
#endregion

#region Connect to Azure
Add-AzureRmAccount

#Select Azure Subscription
$subscription =
(Get-AzureRmSubscription |
        Out-GridView `
        -Title 'Select an Azure Subscription ...' `
        -PassThru)

Set-AzureRmContext -SubscriptionId $subscription.Id -TenantId $subscription.TenantID
#endregion

#region create Resource Group to test Azure Template Functions
If (!(Get-AzureRMResourceGroup -name $ResourceGroupName -Location $Location -ErrorAction SilentlyContinue)) {
    New-AzureRmResourceGroup -Name $ResourceGroupName -Location $Location
}
#endregion

#region variables
$ARMTemplateFile = 'C:\Temp\_output\dts\azuredeploy.json'
$ParameterFile = 'C:\Temp\_output\dtc\azuredeploy.parameters.json'
#endregion

#region Test ARM Template
Test-AzureRmResourceGroupDeployment -ResourceGroupName $ResourceGroupName `
    -TemplateFile $ARMTemplateFile `
    -TemplateParameterFile $ParameterFile `
    -OutVariable testarmtemplate
#endregion

#region Deploy ARM Template with local Parameter file
$result = (New-AzureRmResourceGroupDeployment -ResourceGroupName $ResourceGroupName `
        -TemplateFile $ARMTemplateFile `
        -TemplateParameterFile $ParameterFile -Verbose -DeploymentDebugLogLevel All)
$result
#endregion
Hope you found this blog post interesting.
References:
- What is Kubernetes?
- Introduction to Azure Container Service for Kubernetes
- Introducing AKS (managed Kubernetes) and Azure Container Registry improvements
- ACS-Engine on Github
- ACS-Engine Download bits
- A multi-container Dockerfile for acs-engine
- Get started with Docker for Windows
- Deploy Kubernetes cluster for Linux containers