Configuration Manager Client Health – Disable Automatic Remediation
System Center 2012 Configuration Manager has a nice new feature to help with that pesky problem of client health. A new client heath task on each machine will perform checks to make sure that key areas such as prerequisites, dependent services and WMI are all functioning and if needed remediate those issues, even repair of WMI or reinstall the client. While this feature can help identify and remediate issues found on the client, and has been shown to increase overall client health, what if you wanted to disable remediation on just some systems but not all. As an example we may want to disable remediation on Servers so no actions are performed on WMI that may cause issues with other applications. In this blog I will discuss the different ways I have found to successfully disable automatic remediation for the Configuration Manager Health Evaluation.
There are a few ways to accomplish this:
Disable Automatic Remediation using Client Push
Disable Automatic Remediation using Group Policy Preferences
Disable Automatic Remediation using Configuration Baseline
Disable Automatic Remediation
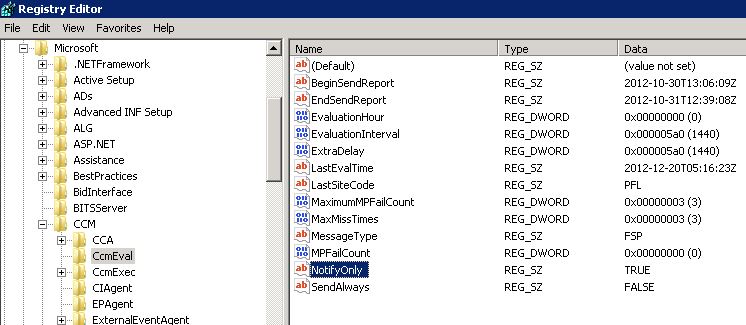
The Configuration Manager Health Evaluation runs as a schedule task and launches an executable called CCMEVAL.EXE which will perform checks and remediation listed in the CCMEVAL.XML file. The SMS Agent Host service will check every hour if this schedule task is present and if the corresponding registry keys are present as well. This can be seen by reviewing the CCMEvalTask.log file in the %windir%\ccm\logs directory.
To disable the Automatic Remediation of the Health Evaluator the registry key HKEY_LOCAL_MACHINE\Software\Microsoft\CCM\CcmEval\NotifyOnly will need to be changed from the default value of FALSE to TRUE. More information can be found on TechNet here.
Changing the key manually works great for a single machine for testing purposes, however trying to disable this on multiple machines may not be practical. So lets review a few ways to disable automatic remediation for multiple machines.
Disable Automatic Remediation using Client Push Properties
When disabling automatic remediation for all machines we can address this at install time or post install time. If we want to install all clients without remediation currently TechNet list a CCMSETUP command line option of /NotifyOnly to disable the remediation during the client install. In my testing this currently does not work and will leave the remediation enabled, as verified by reviewing the registry key list above.
Now if we happen to review the Client.MSI we will find that in the Property Table there is a Public Property for NOTIFYONLY set to FALSE.
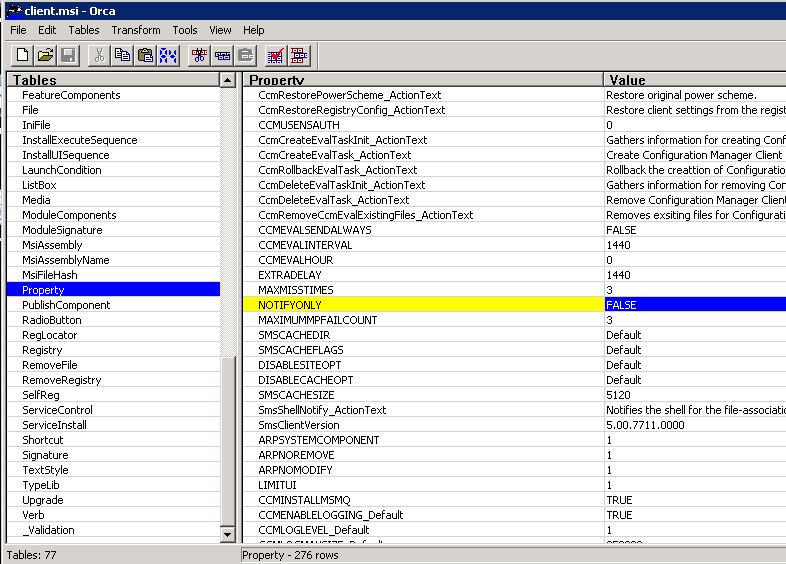
With NOTIFYONLY being an MSI Public Property, this means this property can be put on a command line when used with CCMSETUP, used in the Administrative Template for Client Install commands, or used in the Client Push Installation Properties along with any of the other Client.msi properties. If we put this command in the Client Push Properties it will publish this to Active Directory and be used anytime a machine launches CCMSETUP.EXE without any command line parameters. It will also be used when I push a client to the machine manually or automatically if client push is enabled.
To enable this as a Client Push property:
- Open the System Center 2012 Configuration Manager Console
- Select Administrator from the Wonder Bar
- Expand Site Configuration and Select Sites
- Select the Site to disable client remediation
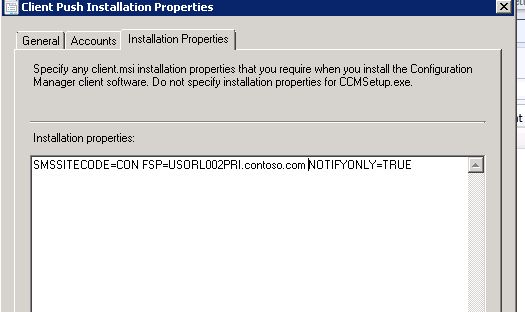
- On the toolbar click on Client Settings and select Client Push Installation
- Select Installation Properties
- Add NOTIFYONLY=TRUE to your command line
- Click on OK
Now for all new installs or reinstalls using Client Push or even running CCMSETUP.EXE with no command line parameters the Client Health remediation will be disabled.
Disable Automatic Remediation using Group Policy Preferences
Using the Install Property is great if you are starting your client rollout and also to make sure that all servers moving forward do not have this enabled by default. However, what about the servers that already have the agent? Depending on my Active Directory organization I may have all my servers in a single OU or at least in a few manageable OUs where I can link a GPO.
Group Policy Preferences allow administrators to manager a greater number of items, such as registry settings, using a GPO. If you are interested there is more information here. There are also some prerequisites needed, such as a client side extension that will need to be install on our Operating Systems versions lower than Windows 7 and Windows 2008. For our scenario this would mean we need this on our Windows 2003 Servers. For now we will go on the basis that this install has already been deployed, if not you may want to skip this section and go straight to using Configuration Items.
- Lets start by opening our Group Policy Management Console from our Windows 2008 or Windows 2008 R2 server.
- Select either an existing GPO that you wish to use or create a new one for this purpose. I will select a GPO I use for my standard servers
- Right Click and Select Edit to edit the GPO
- Under the Computer section expand Preferences > Windows Settings > Registry.
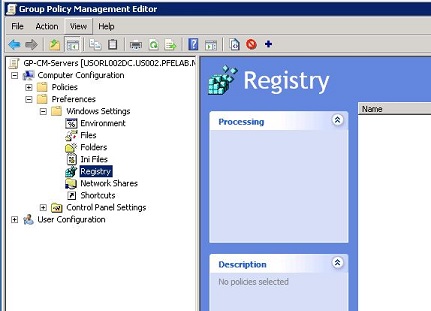
- Right Click on Registry and select New > Registry Item
- Change the Action to Replace
- Leave the hive to be HKEY_LOCAL_MACHINE
- For the Key Path select browse and browse to the key SOFTWARE\Microsoft\CCM\CcmEval or simply type it in
- Select theREG_SZ Value of NotifyOnly with the data of TRUE
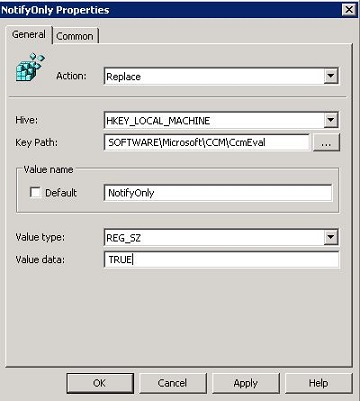
- Click OK and close the Group Policy Editor
- Now we will need to link this GPO to the Servers OU.
- Once linked we can test this by running a gpupdate /force on our target machine and validate that the registry key has been replaced with TRUE.
Something to note is that during the install of the Configuration Manager client the registry key above would be removed and set to the default value of FALSE be used until the GPO Policy was refreshed. This could leave a Server in an undesirable state for a period of time. Also, in some cases, such as an Active Directory structure that would not allow for easy linking of the GPO or if the clients side extensions have not been rolled out we may still need another option. This is a good option but may not be fore everyone.
Disable Automatic Remediation using Compliance Baseline
Setting a Client Push Property is great, but that would affect all the installs for that specific site. If you are managing machines of which some you want the remediation enabled and others you do not then this would not work. The best option I found was to keep it all in Configuration Manager by using Configuration Items Auto Remediation to assist here. We can take advantage of the Client Push Property to disable the Auto Remediation on all clients and only enable it on those who need it since they need to have the client first.
Update Client Push Properties for NOTIFYONLY.
The first step is to make sure that all machines are install with auto remediation disabled so we do not get a machines, such as a server in a non desirable state. Use the steps above to complete this.
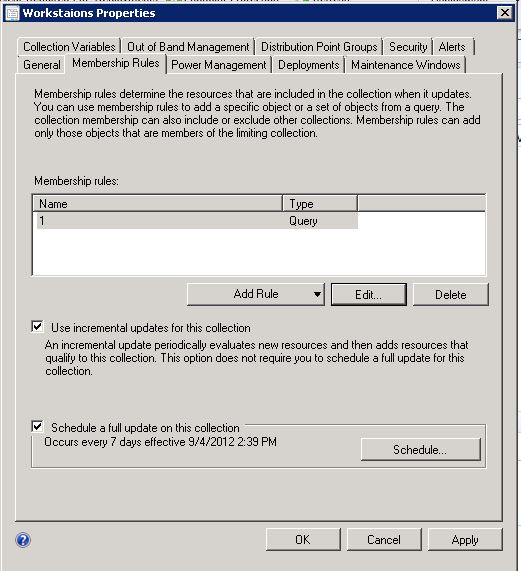
Create a Collection of Workstation Machines
The next step is to create a query based collection that has only the machines that we wish to have the automatic remediation enabled on. I created a collection that had a single query rule for:
select SMS_R_SYSTEM.ResourceID,SMS_R_SYSTEM.ResourceType,SMS_R_SYSTEM.Name,SMS_R_SYSTEM.SMSUniqueIdentifier,SMS_R_SYSTEM.ResourceDomainORWorkgroup,SMS_R_SYSTEM.Client from SMS_R_System where SMS_R_System.OperatingSystemNameandVersion like "Microsoft Windows % Workstation%"
Make sure to take advantage of Dynamic collection updating by selecting the box for "Use incremental updates for this collection".
Create Configuration Item for Registry Key
We can use the new automatic remediation feature of Compliance settings to not only monitor if this NOTIFYONLY registry key is set to False, but change that value as needed.
- To start open the Console and expand the Compliance Settings on the Asset and Compliance wonder bar.
- Right click on Configuration Item and select Create New Configuration Item.
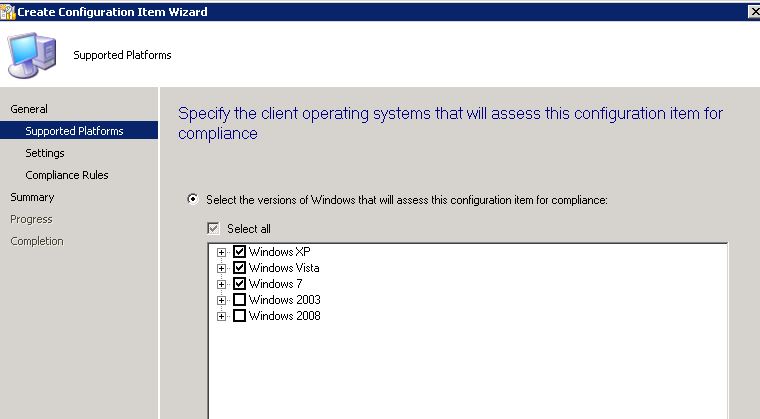
- Give it a name such as Enable Client Remediation and leave the rest as the default and Click Next
- For the selected Platform I have unchecked the Server Operating Systems as I only want this to run on my workstation platforms
- On the Settings click on the New button to create a new setting
- Give it a name such as Notify Only
- Leave the Setting type as Registry Vale
- Select String for the Data Type
- Click Browse to browse for the registry key and navigate to HKEY_LOCAL_MACHINE\Software\Microsoft\CCM\CcmEval\
- Select the NotifyOnly String
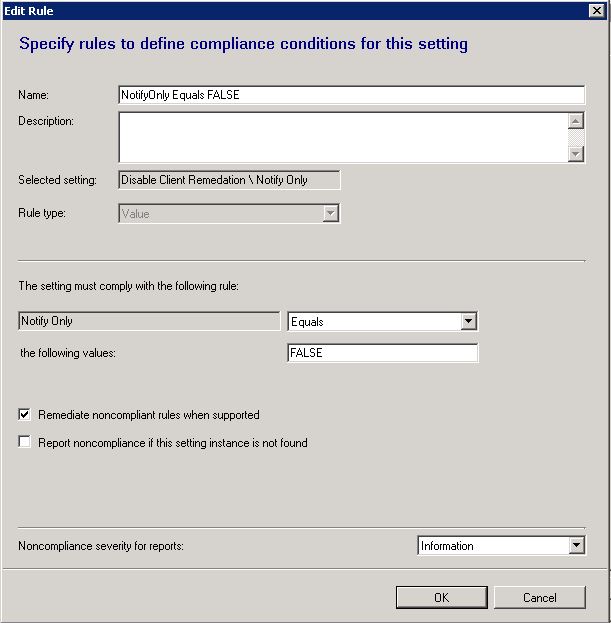
- Check the box for "This registry value must satisfy the following rule if present:"
- Make sure it is Equals FALSE
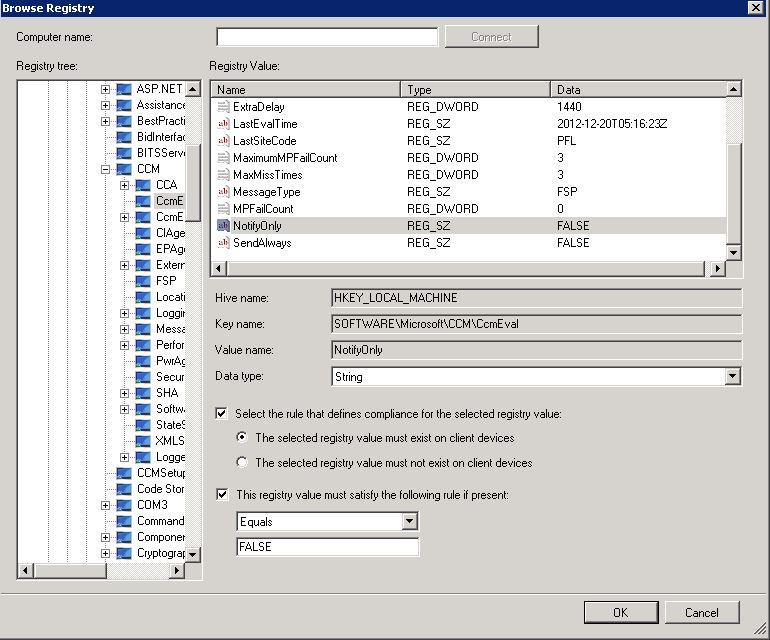
- Click OK
- Click on the Compliance Rules and you will see two new compliance rules
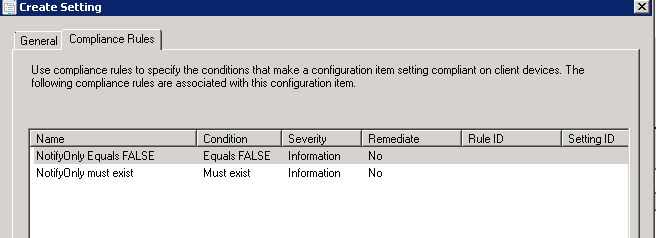
- Select NotifyOnly Equals FALSE and click on Edit
- Check the box for "Remediate noncompliant rules when supported"
- Click OK, OK, Next and Finish to complete the Configuration Item
Create and Deploy Baseline for CCM Evaluation Remediation
Now that we have a Configuration Item created we need to create a Baseline that we can use to deploy to our workstation collection.
- In the console under Compliance Settings select Configuration Baselines
- Right Click Configuration Baselines and select Create Configuration Baseline
- Give the baseline a name such as Client Health. We could easily use this for other client health tasks at a later time.
- Next click on the Add button under Configuration Data and select Configuration Item
- Select the new Configuration Item created "Enable Client Remediation" and click Add
- Click OK
- We should see the baseline now in the console. Select the baseline and click on the Deploy button on the ribbon bar
- Check the box for "Remediate noncompliant rules when supported"
- Check "Allow remediation outside of maintenance windows". This will make sure we enabled this as soon as possible.
- Click browse for next to Collections and select the Device from the dropdown
- Select the Workstations Collection that was created earlier
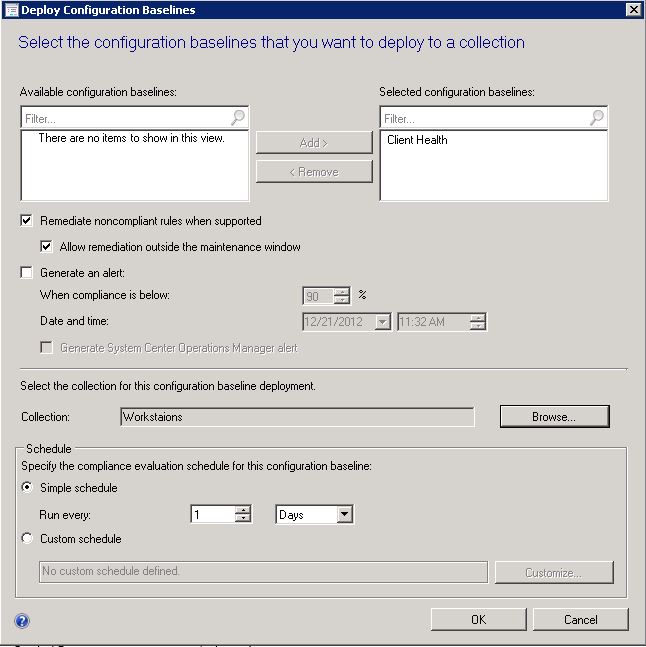
- We can leave simple schedule to every 1 day and click OK
Testing
- For testing identify a machine that is currently in the Workstation collection and logon to this test machine.
- Open the Configuration Manager Properties in the Control Panel
- Select "Machine Policy Retrieval & Evaluation Cycle" and click on Run Now
- Once the policy is refreshed select the Configurations Tab
- We should now see the Client Health baseline, if not try to click the Refresh button until it shows up. It may show up as compliance state as unknown. Select the baseline and click on the Evaluate button.
- After evaluation it should come back as compliant. Click on the View Report button to see the report.

- We should see on the bottom that the Remediated Rule will show what exactly has changed if anything.
This process could also be repeated to make sure that all Servers have the value set to TRUE for those machines that currently have the agent already rolled out.
Closing
So in conclusion we have a few different way to disable the automatic remediation for those key machines that should not be remediated with out administrative intervention, such as servers. We are able to use the Client Push Property for NOTIFYONLY to disable the remediation for all machines and use a Configuration Baseline to target only selected machines for remediation. In another post we will take a deeper look at what remediation's actions are specifically done.