Migrate from MRM v1.0 to MRM v2.0
I recently worked on helping migrate from Exchange 2007 Managed Folders or MRM v1.0 to Exchange 2010 Retention Policies or MRM v2.0, in doing so I realized that it would be useful for the community to see this migration in action with an example and some screenshots! To start, let me set the stage with some details on the versions involved in this testing. I am running Exchange Server 2007 SP3 RU8 and Exchange Server 2010 SP2 RU4 in my lab. 2007MRMUSER is a mailbox that I created on Exchange Server 2007. “365 Day Retention” is a Custom Managed Folder with associated Managed Folder Content Settings named “365 Day – Content Settings”. A Managed Folder Mailbox Policy named “365 Day – MRM Policy” has been created and assigned to 2007MRMUSER. Below are the steps that were taken to set this up
New-Mailbox -Name '2007MRMUSER2' -Alias '2007MRMUSER2' -OrganizationalUnit 'TAILSPINTOYS.LOCAL/Users' -UserPrincipalName '2007MRMUSER2@TAILSPINTOYS.LOCAL' -SamAccountName '2007MRMUSER2' -FirstName '2007MRMUSER2' -Initials '' -LastName '' -Database 'E2007\First Storage Group\Mailbox Database'
Custom Managed Folder Creation
New-ManagedFolder -Name '365 Day Retention' -FolderName '365 Day Retention' -StorageQuota 'unlimited' -Comment 'Move Items to this folder to retain for 1 Year'
Managed Folder Content Settings
New-ManagedContentSettings -Name '365 Day – Content Settings' -FolderName '365 Day Retention' -RetentionAction 'DeleteAndAllowRecovery' -AddressForJournaling $null -AgeLimitForRetention '365.00:00:00' -JournalingEnabled $false -MessageFormatForJournaling 'UseTnef' -RetentionEnabled $true -LabelForJournaling '' -MessageClass '*' -MoveToDestinationFolder $null -TriggerForRetention 'WhenDelivered'
New-ManagedFolderMailboxPolicy -Name '365 Day – MRM Policy' -ManagedFolderLinks '365 Day Retention'
Managed Folder Policy Assignment to the user
Set-Mailbox 2007MRMUSER –ManagedFolderMailboxPolicy ‘365 Day – MRM Policy”
After the above steps have been executed, typically you would wait for the Managed Folder Assistant (MFA) to process the mailbox defined in the settings for the Managed Folder Assistant. NOTE: In my lab, I executed Start-ManagedFolderAssistant on the mailbox server hosting the database that the mailbox was created in (E2007\First Storage Group\Mailbox Database). Once the MFA processes the mailboxes, the user would see the Managed Folder in Outlook and Outlook Web Access like below
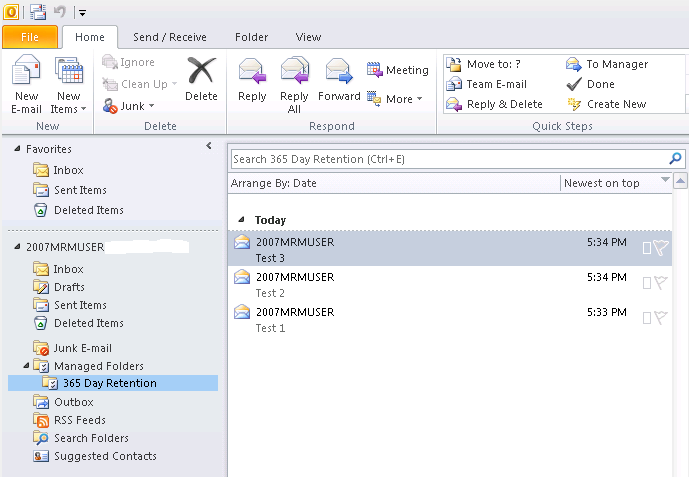
Figure 1: Managed Folders visible in Outlook 2010
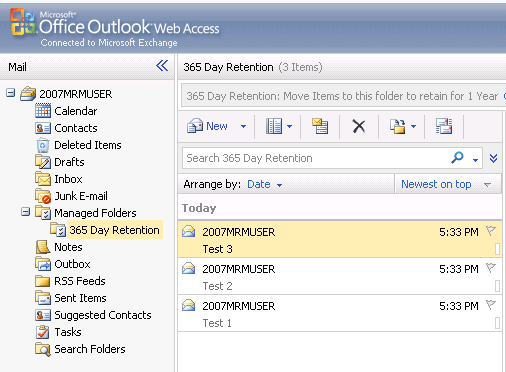
Figure 2: Managed Folder visible in Outlook Web Access
This is usually the method adopted by customers to setup MRM for Exchange 2007 users. The interesting part is when we need to start planning for migration from MRM v1.0 to MRM v2.0. As we know Exchange 2010 introduced a completely new approach to MRM and greatly depends on end user interaction for managing their e-mail. Retention Policies and Retention Tags are the “new MRM” in Exchange 2010. Many customers ask “Well, we have been running Exchange 2007 for a long time and our users are accustomed to using Managed Folders and the MRM v1.0 functionality which in many respect meant that the Exchange Administrator would setup the policies and folders. The user would be required to move items to the Managed Folder. We would like to make the now legacy managed folders still available to our users in Outlook and OWA. We would also like to retain the content settings that were applied to those folders by automatically applying a retention policy on the folder. The user experience should remain very similar to how they have been using Managed Folders. We will educate out users about the new capabilities of MRM v2.0, retention tags and policies etc. but, continued uninterrupted managed folder experience needs to be maintained in the interim”
The key take away here is to maintain a similar experience for the user. This is absolutely possible with Exchange 2010 and we can use a simple method to achieve the required objective. Exchange 2010 introduced the concept of Porting a Managed Folder. But, before we get in to the details of how to accomplish this, let’s quickly take a look at a couple of important factors discussed here, especially the ones below
The RetentionAction parameter specifies one of the following actions:
- MarkAsPastRetentionLimit If you specify this action for a retention tag, messages that have the tag applied are marked as past the retention limit.
- MoveToFolder This action isn't available for retention tags.
- MoveToDeletedItems This action isn't available for retention tags.
- DeleteAndAllowRecovery This action deletes a message and allows recovery from the Recoverable Items folder.
- PermanentlyDelete This action permanently deletes a message. A message that has been permanently deleted can't be recovered using the Recoverable Items folder. Permanently deleted messages aren't returned in a Discovery search, unless litigation hold is enabled for the mailbox.
- MoveToArchive This action moves a message to the user's archive mailbox. You can use this action for retention tags of type All, Personal and RecoverableItems.
If this parameter isn't present and the RetentionEnabled parameter is set to $true, an error is returned.
The above highlighted items are very important to understand. The takeaway is that if you have specified either one of those possible actions to take in the Managed Content Settings of a folder, guess what? You are out of luck and the below procedure will not work!!
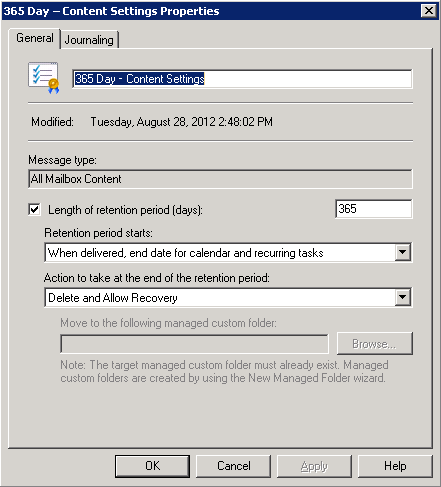
Figure 3: Managed Folder Content Settings
As you note above, my managed folder content setting was set to DeleteAndAllowRecovery. The steps outlined below explain how we can port the Managed Folder Content Settings to create a Personal Retention Tag. We will then create a new Retention Policy which includes the Retention Tag that was ported and assign it to the user. Once this is completed, the Managed Folders now become, unmanaged; but they will have the created Retention Policy applied to the folder. This essentially provides the exact same settings and experience that the user had before moving to using Retention Tags and Policies for the new unmanaged folders! NOTE: I have moved the mailbox to Exchange Server 2010 at this point
New-RetentionPolicyTag -Name '365 –Day Retention Tag' -ManagedFolderToUpgrade '365 Day Retention'
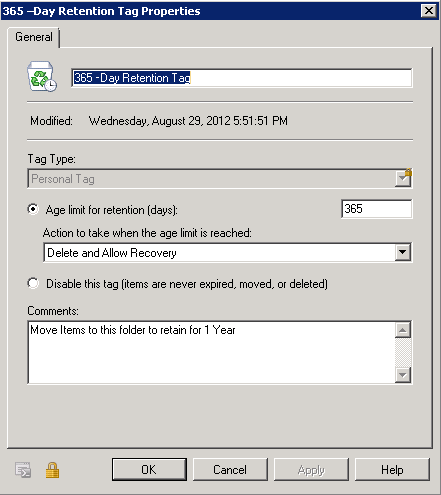
Figure 4: New Retention Policy Tag Created
Creating a New Retention Policy and including the Policy Tag created above
New-RetentionPolicy "365 Day Retention Policy" -RetentionPolicyTagLinks "365 – Day Retention Tag"
Assign the Retention Policy to a User
Set-Mailbox "2007MRMUSER" -RetentionPolicy "365 Day Retention Policy"
Once the above steps have been completed the Managed Folder that existed will show up in the Users Mailbox as regular folders in the mailbox. When you check the Retention Policy Assignment to the folder you will see that the folder is automatically applied with the “365 Day Retention Policy”!!
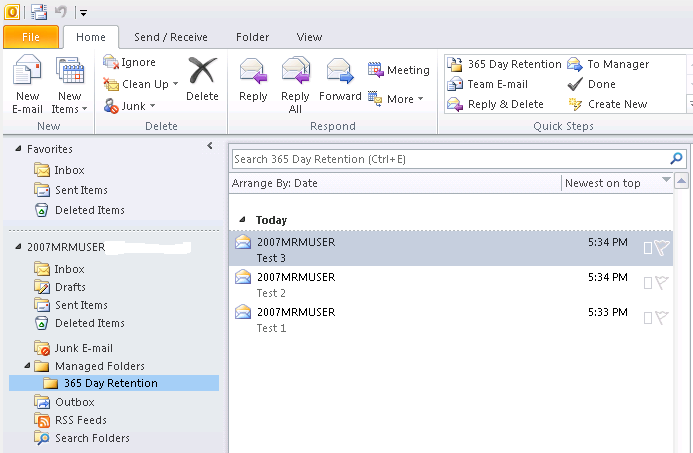
Figure 5: The Managed Folder shown as regular folders in the Mailbox
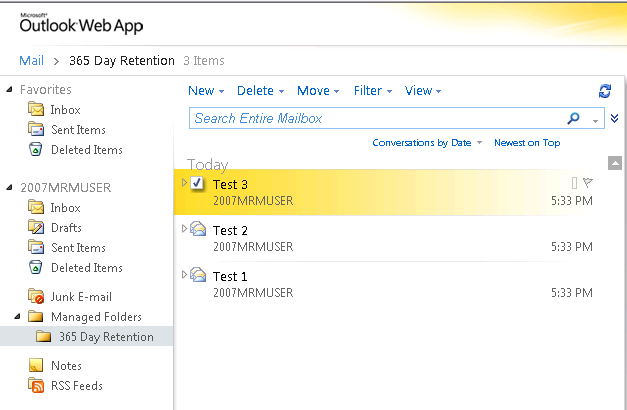
Figure 6: Managed Folder now in Outlook Web Access
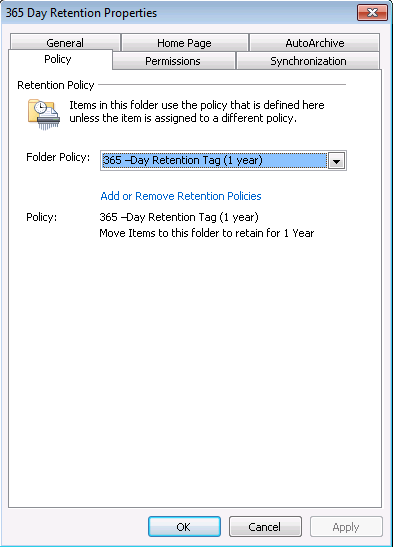
Figure 7: Properties of the folder showing the 365 Day Retention Policy assigned
NOTE: Any Managed Folders that you ported which did not have any content will be removed. Only folders with content are shown in the mailbox as a regular folder.
I hope that you find the above useful!