Build your own external authentication provider for AD FS in Windows Server 2012 R2: Walk-through Part 2
Update the adapter for successful authentication
In Part 1, we created a basic adapter implementation and added it to an AD FS server. We can get the MFA forms page, but we cannot yet authenticated because we have not yet put the correct logic in our TryEndAuthentication implementation. So let’s add that. Back to our code...
Recall our TryEndAuthentication implementation:
 public IAdapterPresentation TryEndAuthentication(IAuthenticationContext authContext, IProofData proofData, HttpListenerRequest request, out Claim[] outgoingClaims)
 {
 //return new instance of IAdapterPresentationForm derived class
 outgoingClaims = new Claim[0];
 return new MyPresentationForm();

 }
Let’s update it so it doesn’t always return MyPresentationForm(). For this we’ll create one simple utility method within our class:
 static bool ValidateProofData(IProofData proofData, IAuthenticationContext authContext)
 {
 if (proofData == null || proofData.Properties == null || !proofData.Properties.ContainsKey("ChallengeQuestionAnswer"))
 {
 throw new ExternalAuthenticationException("Error - no answer found", authContext);
 }

 if ((string)proofData.Properties["ChallengeQuestionAnswer"] == "adfabric")
 {
 return true;
 }
 else
 {
 return false;
 }
 }
Then, update TryEndAuthentication as below:
 public IAdapterPresentation TryEndAuthentication(IAuthenticationContext authContext, IProofData proofData, HttpListenerRequest request, out Claim[] outgoingClaims)
 {
 outgoingClaims = new Claim[0];
 if (ValidateProofData(proofData, authContext))
 {
 //authn complete - return authn method
 outgoingClaims = new[]
 {
 // Return the required authentication method claim, indicating the particulare authentication method used.
 new Claim( "https://schemas.microsoft.com/ws/2008/06/identity/claims/authenticationmethod",
 "https://example.com/myauthenticationmethod1" )
 };
 return null;
 }
 else
 {
 //authn not complete - return new instance of IAdapterPresentationForm derived class
 return new MyPresentationForm();
 }
 }
Now you will have to update the adapter on the test box. It is a little painful (i apologize for that) because you have to undo the AD FS policy, then un-register from AD FS and restart AD FS, then remove the dll from the GAC, then add the new dll to the GAC, then register it in AD FS, restart AD FS, and re-configure AD FS policy. I will walk you through it...
Deploy and configure the updated adapter on your test AD FS machine
Clear AD FS Policy
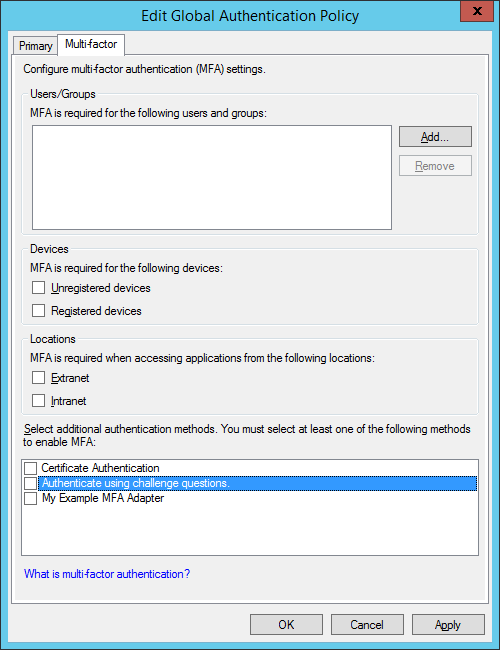
Clear all MFA related checkboxes in the MFA UI, shown below, then click OK.
Unregister provider (PowerShell)
PS C:\> Unregister-AdfsAuthenticationProvider –Name “YourAuthProviderName”
Example:
PS C:\> Unregister-AdfsAuthenticationProvider –Name “MyMFAAdapter”
- Note that the value you pass for “Name” is the same value as “Name” you provided to the Register-AdfsAuthenticationProvider cmdlet. It is also the “Name” property that is output from Get-AdfsAuthenticationProvider.
- Note that before unregistering a provider, must remove the provider from the AdfsGlobalAuthenticationPolicy (either by clearing the checkboxes you checked in AD FS admin MMC snapin or by using PSH)
- Note that the AD FS service must be restarted after this operation
Remove assembly from GAC (cmd line)
To remove assembly from GAC
First, use the following command to find the fully qualified strong name of the entry:
C:\>.\gacutil.exe /l <yourAdapterAssemblyName>
Example:
C:\>.\gacutil.exe /l mfaadapter
Then, use the following command to remove it from the GAC:
.\gacutil /u “<output from the above command>”
Example:
C:\>.\gacutil /u “mfaadapter, Version=1.0.0.0, Culture=neutral, PublicKeyToken=e675eb33c62805a0, processorArchitecture=MSIL”
Add the updated assembly to GAC (cmd line)
Make sure you paste the updated dll locally first :)
C:\>.\gacutil.exe /if .\MFAAdapter.dll
View assembly in the GAC (cmd line)
C:\> .\gacutil.exe /l mfaadapter
Register your provider in AD FS
PS C:\>$typeName = "MFAadapter.MyAdapter, MFAadapter, Version=1.0.0.1, Culture=neutral, PublicKeyToken=e675eb33c62805a0, processorArchitecture=MSIL”
PS C:\>Register-AdfsAuthenticationProvider -TypeName $typeName -Name “MyMFAAdapter1”
Restart the AD FS service
Create policy using the AD FS Management snapin
1) Open the AD FS Management Snapin (from Server Manager Tools menu)
2) Click Authentication Policies at left
3) In the center pane, under Multi-Factor Authentication, click the blue Edit link to the right of Global Settings.
4) Under Select additional authentication methods at the bottom of the page, check the box for your provider’s AdminName. Click Apply.
5) To provide a “trigger” to invoke MFA using your adapter, under Locations check both “Extranet” and “Intranet”, for example. Click OK.
Authenticate with MFA using your adapter
Finally, perform the steps below to test your adapter:
- Ensure the AD FS global Primary authentication type is configured as Forms Authentication for both Extranet and Intranet (this makes your demo easier to authenticate as a specific user)
- In the AD FS snapin, under Authentication Policies, in the Primary Authentication area, click Edit next to Global Settings
- Or just click the Primary tab from the Multi-factor policy UI
- In the AD FS snapin, under Authentication Policies, in the Primary Authentication area, click Edit next to Global Settings
- Ensure Forms Authentication is the only option checked for both the Extranet and the Intranet authentication method. Click OK.
- Open the IDP initiated signon html page (https://<fsname>/adfs/ls/idpinitiatedsignon.htm) and sign in as a valid AD user in your test environment
- Enter credentials for primary authentication
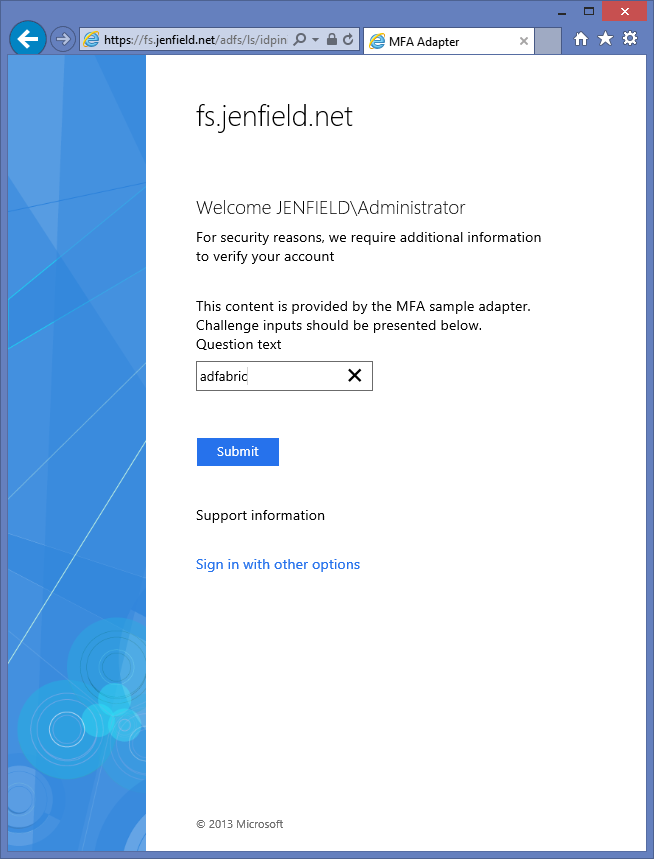
- You should see the MFA forms page with example challenge text appear.
- if you have more than one adapter configured, you will see the MFA choice page with your friendly name
You should see a successful signin when entering “adfabric” at the MFA authentication page.

Also check out these excellent blogs from my colleague at Microsoft.