Support-Tip: (AADCONNECT): Custom Synchronization Rules - (Testing)
PRODUCT USED FIR THIS BLOG
I utilized the following Azure AD Connect builds for the snapshots involved in this blog:
Azure AD Connect v1.1.443.0
Azure AD Connect v1.1.281.0
NOTE: This applies to all versions of Azure AD Connect currently
PURPOSE
I am writing this blog with the intention to discuss Custom Synchronization Rules in Azure AD Connect. I want to provide some information about the understanding of Custom Synchronization Rules and just how powerful they really are in your On-Premise to Cloud Solution.
Synchronization Rules provide the ability to control how information flows from Point A to Point B. In this case, going from an On-Premise Data Source such as Active Directory to the Cloud (Azure / Office 365). Default Synchronization Rules are provided during the Installation / Configuration Wizard based on options that you select. More information about the Default Synchronization Rules can be found here:
Azure AD Connect Sync: Understanding the default configuration: /en-us/azure/active-directory/connect/active-directory-aadconnectsync-understanding-default-configuration
Azure AD Connect Sync does provide the flexibility to create Customized Synchronization Rules to allow you to be able to develop solutions that adhere to your companies business rules. A Customized Synchronization Rule is a rule that is not a Default Synchronization Rule. Examples would be:
- Cloned Default Synchronization Rule
- Brand New Synchronization Rule
My main goal in this blog, is to express the high importance it is to test and ensure that your customizations work successfully prior to fully enabling them into your production environment. A few different avenues exist to test a customized synchronization rule prior to fully implementing it into production.
Testing a New or Modified Synchronization Rule prior to fully implementing it into production is crucial. Testing a New or Modified Synchronization Rule:
- Confirms that your Customized Synchronization Rule fires when expected
- Provides the ability to see what will happen when your Customized Synchronization Rule is fired
- Could possibly prevent a potential disaster and/or work outage.
Basically, what I am saying here, is TEST! TEST! TEST!
When I raise the issue of testing a New/Modified Synchronization Rule, the question comes about, well how does one test a Customized Synchronization Rule? This is a great question and my hope here is to provide information on how to do just that, test a Customized Synchronization Rule.
Let's discuss!
HOW TO TEST A NEW OR CHANGED CUSTOMIZED SYNCHRONIZATION RULE
Let's first understand, that when we are synchronizing an object whether it be through some of the testing items below documented or just running a normal synchronization, it is all within the actual synchronization service engine. The communication is between the Synchronization Service and the backend SQL Server. We are not touching the External Data Source while synchronizing.
- NOTE: It is extremely important to understand that the Synchronization Cycle that is executed from the command-line and/or the Scheduled
Let's discuss some of the options available to test a New/Modified Synchronization Rule as there are a few different options.
| STAGING MODE |
| Staging Mode is a great way to control the environment while working/developing new configurations based on business rules. I am not going to cover a lot about Staging Mode here in this blog, as there is great information found here:Staging Mode: https://docs.microsoft.com/en-us/azure/active-directory/connect/active-directory-aadconnectsync-operations#staging-mode |
| PREVIEW FEATURE | ||||||
If you came from the FIM/MIM product, you may be aware of the Preview Feature. The Preview Feature is a very useful feature when troubleshooting an issue or testing a new or modified configuration. Preview provides the ability to synchronize a single object. This way, you can work with a specific problem object, or locate an object that your new or modified configuration applies.You will find the Preview button on the Connector Space Properties page in the lower left.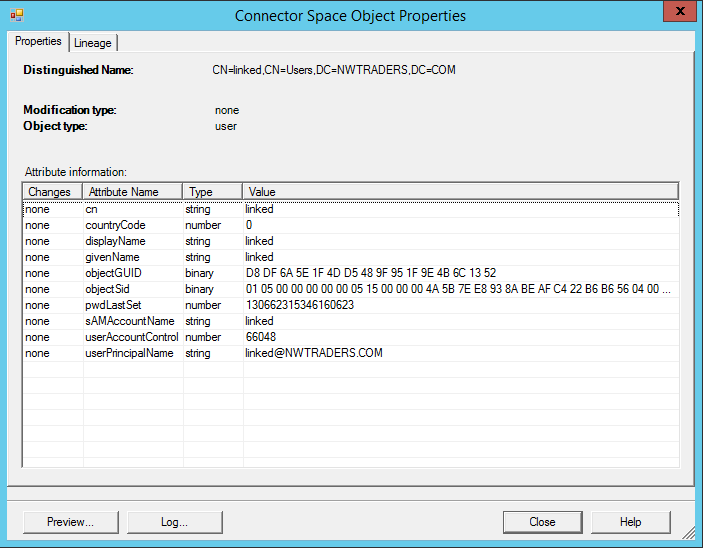 I am not going to go through all of the Preview information here. I will write another blog that focuses on reviewing Preview results. Here, I want to quickly discuss the Preview Modes. I am not going to go through all of the Preview information here. I will write another blog that focuses on reviewing Preview results. Here, I want to quickly discuss the Preview Modes.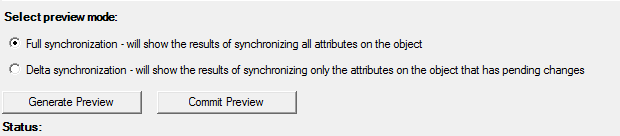
|
| CONTROLLING THE EXPORT |
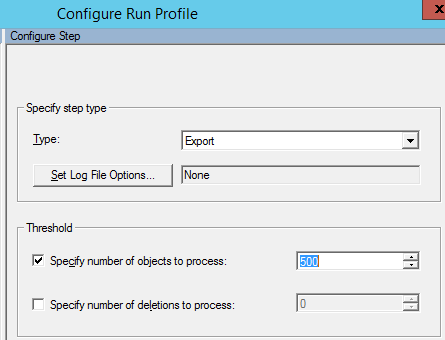
Thinking about testing the Export Process and/or reviewing objects prior to Exporting the objects, I can think of a few different avenues.You can review an object that is ready to Export by searching for the user using Search Connector Space and/or Metaverse Search and reviewing the Connector Space Properties.An object that is pending an export will have a tab at the top of the Connector Space Properties dialog that states "Pending Export" This is the state of the object currently. On this tab, you can review the Changes column to see what action is happening to the attributes that are being exported. You can execute an entire Export and review the information being exported by dumping the information to a file and then reviewing the information. Utilize "Create a log file and stop the run. Do not export to data source (test only)". You can find this data in Configure Run Profiles > <Run Profile Name> > Set Log File Options. The file is dumped to the MADATA folder. (%programfiles%\Microsoft Azure AD Sync\MaData) You can execute an entire Export and review the information being exported by dumping the information to a file and then reviewing the information. Utilize "Create a log file and stop the run. Do not export to data source (test only)". You can find this data in Configure Run Profiles > <Run Profile Name> > Set Log File Options. The file is dumped to the MADATA folder. (%programfiles%\Microsoft Azure AD Sync\MaData) Another option to test an Export prior to fully committing a full Export is to "Export using a Threshold". You can control the number of objects to process on the Export by again going into the configuration settings for the Run Profile. Under the Threshold section, check mark the "Specify the number of objects to process" and then enter the number of objects to process. This will allow you to control the number of objects that are exported. Another option to test an Export prior to fully committing a full Export is to "Export using a Threshold". You can control the number of objects to process on the Export by again going into the configuration settings for the Run Profile. Under the Threshold section, check mark the "Specify the number of objects to process" and then enter the number of objects to process. This will allow you to control the number of objects that are exported.
 |
ADDITIONAL REFERENCES
| AZURE AD CONNECT DOCS |
|
| AZURE AD CONNECT EXAMPLE CUSTOM SYNC RULES |
|
| AZURE AD SYNC FILTERING |
|
Author: Tim Macaulay (timmac@microsoft.com)