DFS in Azure
Often we want to use Azure's scalable storage to deploy file servers. For geographically distributed infrastructures, it makes sense to establish a distributed file system (DFS) that spans across regions, both for availability and reach.
Here is a summary of the steps required to do so:
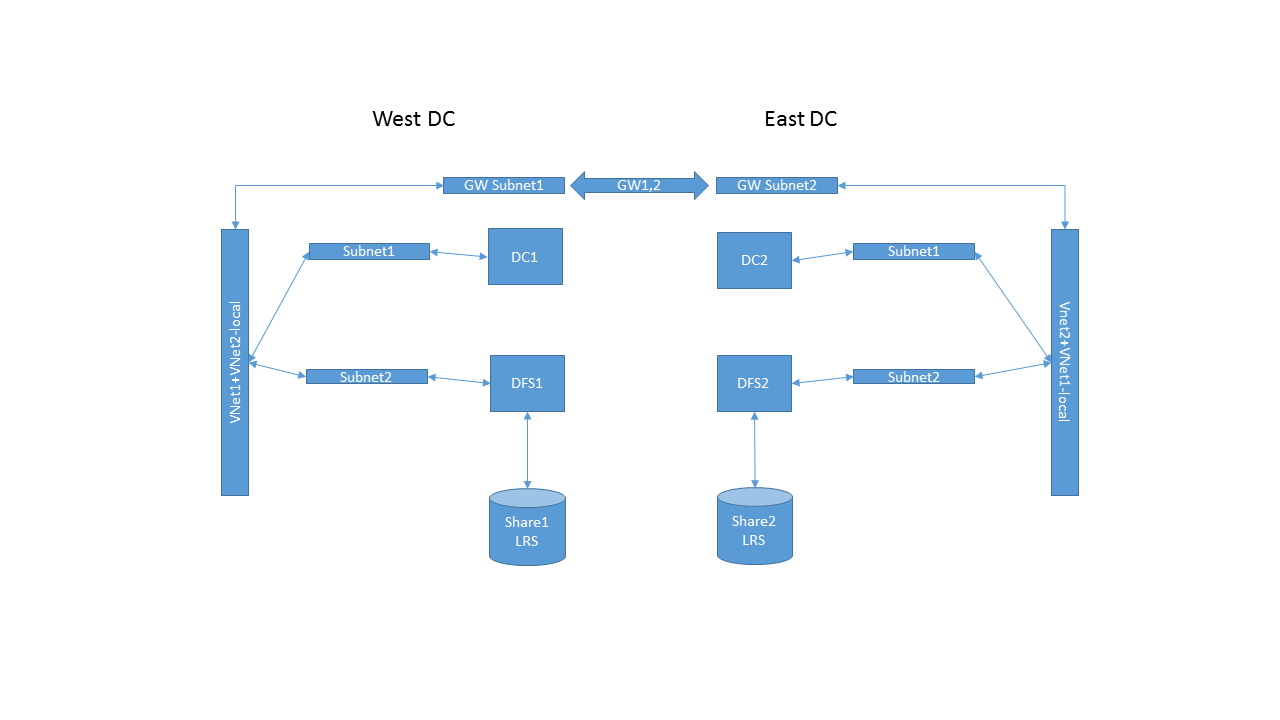
- Create a vnet in each desired datacenter, ideally with at least 2 subnets (1 for the domain controllers, another for the file servers) + 1 for the gateway
- Establish cross-premise connectivity in Azure, for instance as explained in https://msdn.microsoft.com/en-us/library/azure/dn690122.asp
- Deploy domain controllers on the relevant subnets in both datacenters. Make sure that the dns option in the vnet configurations points to both domain controllers in the appropriate order (dc1, dc2 on vnet1 - dc2, dc1 on vnet2).
- It is recommended that you assigned a fixed ip to the domain controllers / dns servers. You will need Powershell to do that as explained in https://msdn.microsoft.com/en-us/library/azure/dn630228.aspx.
- Deploy servers on the relevant subnets and join them to the domain.
- Add at least a data volume each to the servers to host the file shares. If you are planning to replicate its content using dfs-r, it may make sense to put the volume on a locally redundant storage account.
- Log into each server and, in “configure local server”, add the DFS namespace and DFS replication features.
- Alternatively, you could use Powershell desired configuration to deploy servers with those features enabled. See https://blogs.msdn.com/b/powershell/archive/2014/08/07/introducing-the-azure-powershell-dsc-desired-state-configuration-extension.aspx
- In the dfs management console on server 1, create a namespace.
- Select “edit settings” and assign full access to administrator, r/w to other users
- Make sure that it is a domain-based namespace and “2008 mode” is enabled. Information about namespace roots is then replicated on namespace servers in the domain.
- Add server 2 as a namespace server to the namespace you've just created for availability.
- Select “new folder” in the namespace.
- Create a new file share hosted on the local data volume (e.g.\\server1\share1). Assign permissions as desired (e.g. admins full access and rest r/w).
- Click on the share you've just created and select “replicate folder”.
- Add a target for the replication on server2 e.g. \\server2\share1
- Create replication group as required, by following prompts.
- You may also want to verify that replication works both ways by creating a share on server2 that is replicated to a target on server1.