How to Exclude Contacts from the Default Address Policy in Exchange 2007
By default, all mail recipients (AllRecipients) will be stamped by the E-mail Address Policy named "Default Policy" in Exchange 2007, unless there are other policies in existence. Some organizations may not wish to stamp their own SMTP address (e.g. contoso.com) on external contact objects for security reasons. Since there is no supported way to modify the Default Policy, a workaround is needed.
Preventing New Contacts from Being Stamped
To prevent new contacts from being stamped by the Default Policy, you can simply create a new policy for contact objects and stamp them with a bogus SMTP address, as follows:
1. Create a new Accepted Domain to correspond with the bogus SMTP address you will be using, e.g. "external.contact." Here is the syntax to perfrom this step from Exchange Management Shell:
New-AcceptedDomain -Name "External Contact" -DomainName external.contact
2. Create a new E-mail Address Policy for contact objects, using the SMTP address you just added:
New-EmailAddressPolicy -Name "Contact EAP" –EnabledPrimarySMTPAddressTemplate SMTP:@external.contact -IncludedRecipients MailContacts
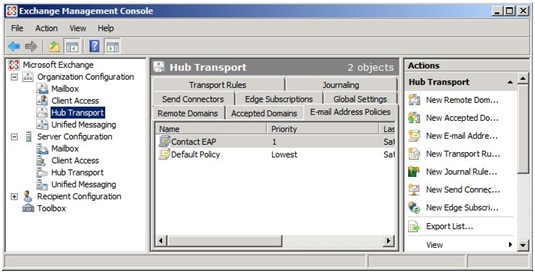
3. Confirm that the new policy has a higher priority than the Default Policy. This will prevent the contacts from ever being stamped by the Default Policy. The Default Policy should be set to "Lowest" priority, but you can confirm as follows:
Get-EmailAddressPolicy
You can also confirm this from the Exchange Management Console by clicking on Organization Configuration | Hub Transport in the Console Tree, then choosing the E-mail Address Policies tab from the Work Pane:
4. Update the Address Policy in order to apply it to the existing Contact objects in the organization:
Update-EmailAddressPolicy -Identity "Contact EAP"
Removing the Internal Address from Existing Contacts
You can now remove the internal SMTP addresses from your existing contacts via a Powershell script. Modify the following text, replacing contoso.com with your SMTP domain, and save it as a text file with a .ps1 extension. (Make sure to remove any line breaks):
Get-MailContact -Filter {EmailAddresses -like "*@contoso.com" -and name -notlike "ExchangeUM*"} -ResultSize unlimited -IgnoreDefaultScope | foreach {$contact = $_; $email = $contact.emailaddresses; $email | foreach {if ($_.smtpaddress -like "*@contoso.com") {$address = $_.smtpaddress; write-host "Removing address" $address "from Contact" $contact.name; $contact.emailaddresses -= $address; $contact | set-mailcontact -emailaddresspolicyenabled $false} }}
Now, open the Exchange Management Shell and change to the directory where your script is saved. For example, if you have named the file RemoveContactSMTP.ps1, the syntax would be as follows:
./RemoveContactSMTP.ps1
You can accomplish the same thing using the ADModify tool, although it is a little more cumbersome:
1. Download the ADModify.NET tool from codeplex.com: https://www.codeplex.com/admodify
2. After unzipping the files, run ADModify.exe and choose Modify Attributes.
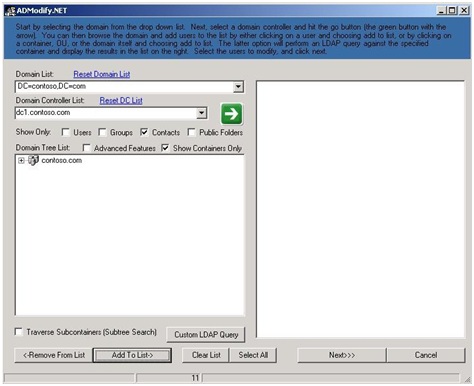
3. In the Domain List drop-down box, choose the item that identifies your domain. This should be in the form DC=contoso,DC=com and NOT the one starting with CN=Configuration.
4. In the Domain Controller List box, choose a DC.
5. Uncheck all the boxes in the "Show Only" line except Contacts, then click the green arrow. After you click the green button, the window should look like this:
6. When your domain shows up in the Domain Tree List box, select it, then click the Add To List button. You will get a warning that this will enumerate the entire domain. Click OK to continue, or you may drill down to a specific OU if you prefer to limit the scope.
7. Once the contacts have been enumerated in the right-hand pane, select the ones you wish to modify and click Next.
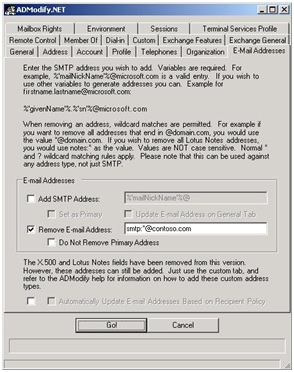
8. Click the E-Mail Addresses tab, then select the checkbox next to Remove E-mail Address. Edit the address to change "domain.com" to the internal SMTP domain you want to remove from the contact objects. Click Go! to continue:
9. Review the dialog that shows completion status, and click OK.
10. Rerun these steps on additional OUs as needed.
Once you have completed all steps, you should have no Contacts in your organization with internal SMTP addresses stamped on them, and new Contacts will not be stamped with them going forward.