Configuring DFS in Windows Server 2012 using Hub-Spoke Topology in a Domain Namespace
Some of this document's content was originally published as https://technet.microsoft.com/en-us/library/cc732863(v=ws.10).aspx and has now been reproduced in Windows Server 2012. This blog shows you how to configure the Hub and Spoke Topology using a Domain Namespace from start to finish.
The Distributed File System (DFS) technologies offer wide area network (WAN)-friendly replication as well as simplified, highly available access to geographically dispersed files.
In Windows Server 2012, DFS is implemented as a role service of the File Services role. The Distributed File System role service consists of two child role services:
-DFS Namespaces
-DFS Replication
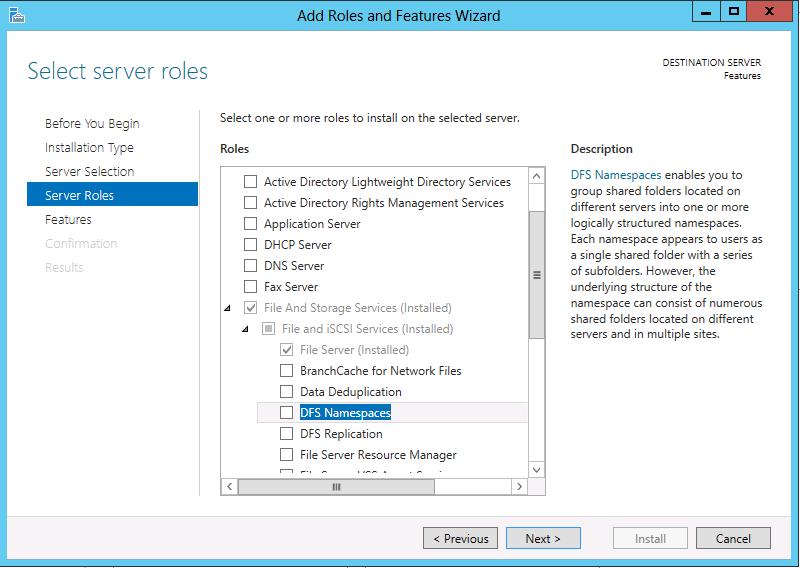
To install DFS
-Open Server Manager, point to roles and features point to Role-based or featured-based installation, select a server from the server pool.
-In the console tree of the Add Roles and Feature Wizard, under File and Storage Services, expand File and iSCSi services to install the Distributed File System roles.
-Follow the steps in the Add Roles Services Wizard, and supply the information described in the following table.
To use DFS Replication, the domain must use the Windows Server 2003 or higher domain functional level. To use all functionality of DFS Namespaces, your environment must meet the following minimum requirements:
-The forest uses the Windows Server 2003 or higher forest functional level.
-The domain uses the Windows Server 2008 or higher domain functional level.
-All namespace servers are running Windows Server 2008.
If your environment supports it, choose the Windows Server 2008 mode when you create new domain-based namespaces. This mode provides additional features and scalability, and also eliminates the possible need to migrate
a namespace from the Windows 2000 Server mode.
-You can also use the DFS Management snap-in hosted by Server Manager to manage DFS Namespaces and DFS Replication.
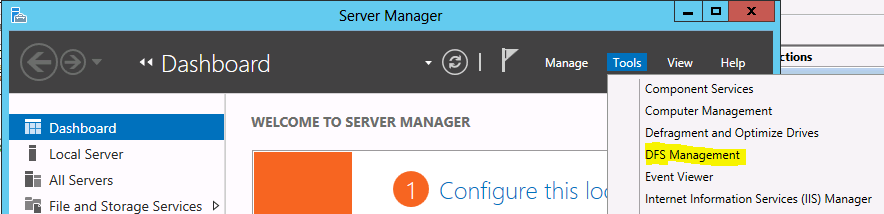
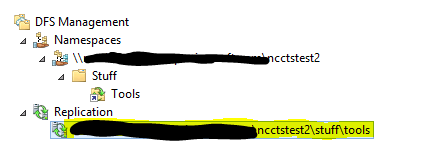
DFS Management Console
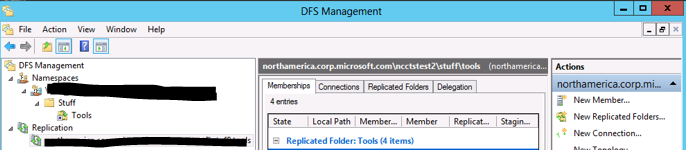
The console tree has two nodes,Namespaces and Replication, from which you can manage namespaces and DFS Replication.
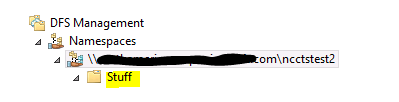
The following figure shows the elements under the Namespaces node in the console tree.

As the figure shows, the Namespaces node contains one namespace called \\Domain.com\ncctstest2 (folder name of your choice).
Under each namespace is a hierarchical view of folders. Folders that have targets use a special icon to differentiate them from folders that do not have targets
The following figure shows the elements under the Replication node in the console tree.

As the figure shows above, the Replication node contains a replication group that represents a group of servers that participates in the replication of data.
-In the console tree of the DFS Management snap-in, right-click the Namespaces node, and then click New Namespace.
-Follow the steps in the New Namespace Wizard and supply the information described in the following table.

New Namespace Wizard page |
What to enter |
Namespace Server |
Enter the name of the server to host the namespace. The server can be a domain controller or a member server. |
Namespace Name and Settings |
In Name, type ncctstest2 (Folder name of your choice) . |
Namespace Type |
If AD DS is deployed in your test lab and you are a member of the Domain Admins group or have been delegated permission to create domain-based namespaces, choose Domain-based namespace. Otherwise, choose Stand-alone namespace. |
Review Settings and Create Namespace |
Click Create to create the namespace. |
Confirmation |
Click Close to close the wizard. |
When the wizard finishes, your new namespace will be added to the console tree. Double-click the Namespaces node, if necessary, to view your namespace,
which should be similar to the following figure.

To browse the new namespace, type the following command in the Run dialog box, substituting either the server name (if you created a stand-alone
namespace) or the domain name (if you created a domain-based namespace) as appropriate:
\\ server_or_domain \ncctstest2 (folder name of your choice)
If you created a domain-based namespace, perform this task to specify an additional server to host the
namespace. Doing so increases the availability of the namespace and enables you to place namespace servers in the same sites as users. If you created a
stand-alone namespace, you must skip this task because stand-alone namespaces only support a single namespace server.
-In the console tree of the DFS Management snap-in, right-click \\ domain \ncctstest2, and then click Add Namespace Server.
-In Namespace server, type the name of another server to host the namespace, and then click OK.
After you finish this procedure,click the \\ domain \ncctstest2 namespace in the console tree and review the contents of the Namespace Servers tab in the details
pane, which should look similar to the following figure. Notice that two UNC paths are listed. The site of each namespace server is also displayed.

Delegate Management Permissions
You can delegate management permissions so that users who are not members of the Domain Admins group can create domain-based namespaces, and you can delegate management permissions so
that users or groups can manage existing namespaces. In this section, you will delegate permissions to manage the namespace you created in the previous task.
To delegate permission to manage an existing namespace
In the console tree of the DFS Management snap-in, right-click \\ server_or_domain \ncctstest2, and then click Delegate Management Permissions.
-Type the name of a user or group that you want to manage the namespace, and then click OK.
After you finish this procedure, review the contents of the Delegation tab in the details pane. It should look similar to the following figure.
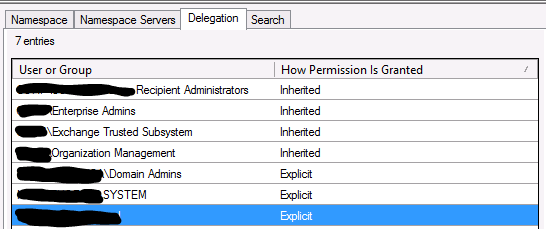
Notice that the groups added shows "Explicit" in the How Permission Is Granted column.
"Explicit" means that you can remove the user or group from the delegation list by right-clicking the user or group, and then clicking Remove.
Any users or groups that show "Inherited" have inherited management permissions from AD DS, and you cannot remove them from the delegation list using the DFS Management snap-in.
In this task, you add folders to the namespace. One of the folders will have folder targets.
To create a folder named Stuff in the namespace
-In the console tree of the DFS Management snap-in, right-click \\ server_or_domain \ncctstest2, and then click New Folder.
-In Name, type Stuff, and then click OK.
Note that the previous procedure creates a new folder in the namespace to build depth in the namespace hierarchy.
You are not specifying the name of an existing folder, nor will you storedata in this folder. This folder will not have folder targets that direct clients to other servers.
After you finish this procedure, the Stuff folder is added to the console tree as shown in the following figure. (You might need to double-click the \\ server_or_domain \ncctstest2
root to display the Stuff folder.
Next, you add a folder with a target to the namespace. You create one folder named Tools within the Stuff folder
To create a folder named Tools in the namespace
-In the console tree of the DFS Management snap-in, right-click the Stuff folder, and then click New Folder.
-In Name, type Tools.
-Click Add to add a folder target.
-Click Browse to open the Browse for Shared Folders dialog box.
-In Server, enter the name of the server that will host the Tools shared folder.
-Click New Shared Folder.
In the Create Share dialog box, in the Share name box, type Tools, and then enter the local path where you
want the shared folder to be created. If the folder does not exist, you are prompted to create it. Click OK to close all dialog boxes.
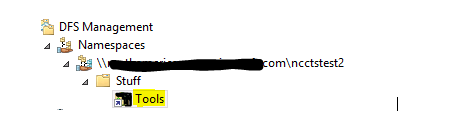
After you finish this procedure, the Tools folder is added to the console tree as shown in the following figure.
(You might need to double-click the Stuff folder to display the Tools folder.)
Notice the icon next to the Tools folder and how it differs from the Stuff folder’s icon. This icon appears next to all folders that have targets to
differentiate them from folders that do not have targets.
Now, select the Tools folder and review the contents of the Folder Targets tab in the details pane.
Notice there is a single path shown. This means that only one server hosts the folder target that corresponds to the Tools folder. If that server becomes
unavailable, the shared folder is also unavailable.
To increase the availability of the Tools folder, you can add a second folder target.
To add a second folder target to the Tools folder
In the console tree of the DFS Management snap-in, right-click the Tools folder, and then click Add Folder Target.
-Click Browse to open the Browse for Shared Folders dialog box.
-In Server, enter the name of another server that will host the Tools shared folder. Be sure to enter a different server
from the one you specified in the previous procedure.
-Click New Shared Folder.
-In the Create Share dialog box, in the Share name box, type Tools, and then enter the local path where you
want the shared folder to be created. If the folder does not exist, you are prompted to create it. Click OK to close all dialog boxes.
-You are prompted to choose whether to create a replication group for these folder targets. For now, click No. You
will enable DFS Replication on this folder in a later task.
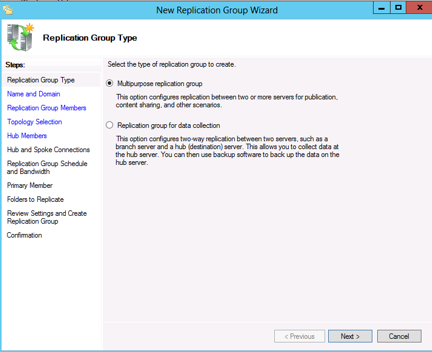
To enable DFS Replication
In the console tree of the DFS Management snap-in, right-click the Replication, and then click New Replication Group.
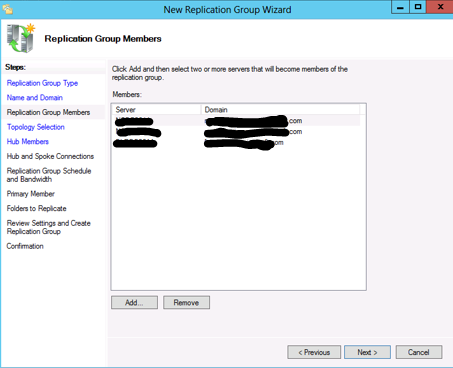
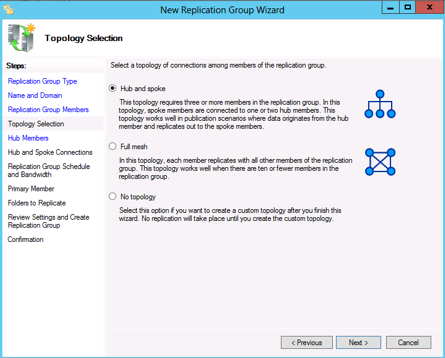
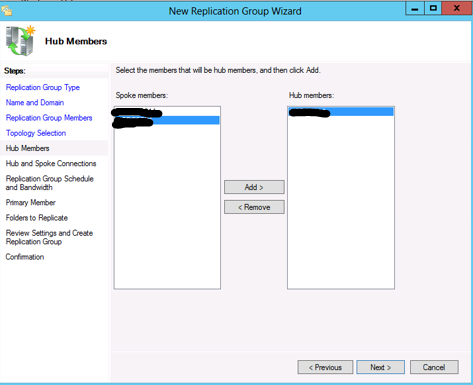
Follow the steps in the Replicate Folder Wizard and supply the information in the following table.
Replication Group Type
Replication Group Name
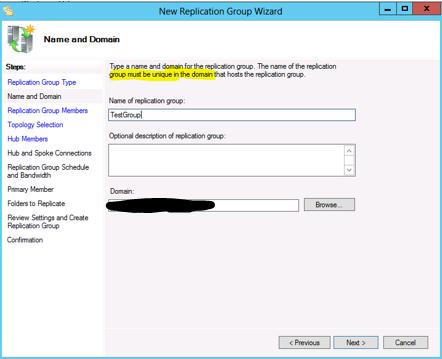
Add Replication Group Members
Topology of connection among members of the replication Group
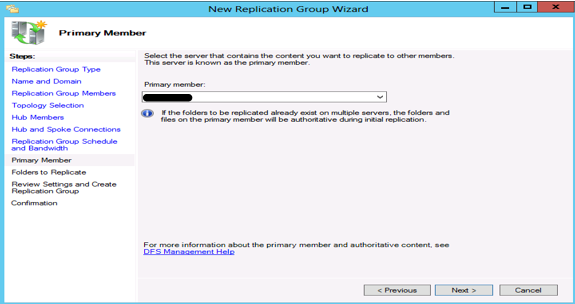
Choose Hub (Primary) Member
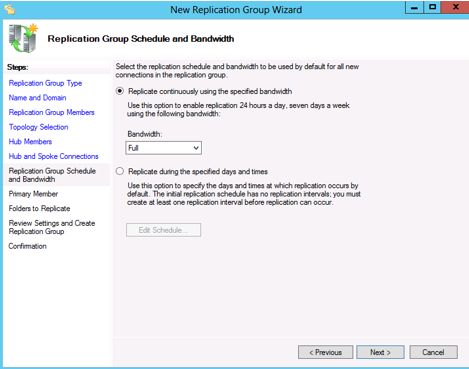
Replication Group Schedule
Select the Primary Server (HUB) that contains the content you want to replicate to other Members
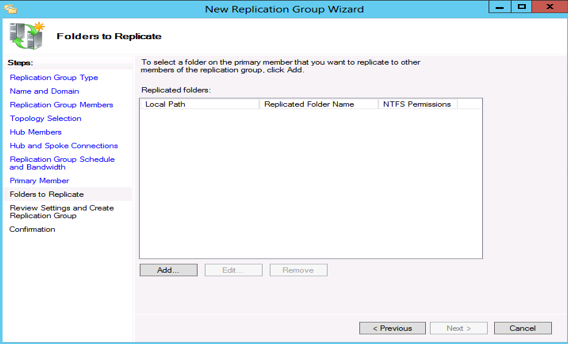
Select/Browse the Folder on the Primary (Hub) that you want replicated to other members
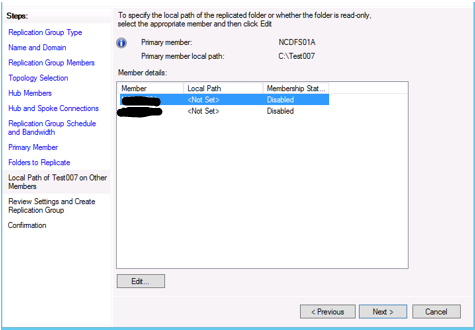
Specify the Local Path of the of the replicated Folder of the Spoke Members
Review Settings and Create Replication Group |
Click Create to create the replication group. |
Confirmation |
Click Close to close the wizard. |
Replication Delay |
Click OK to close the dialog box that warns you about the delay in initial replication. |
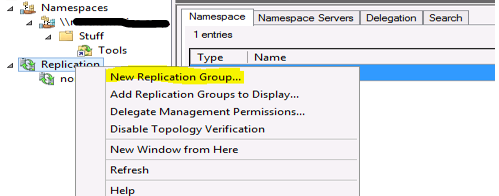
After you finish the previous procedure, navigate to the Replication node in the console tree. Notice that a new replication group has been created,
as shown in the following figure.
If you are not familiar with DFS Replication terminology, a replication group is a set of servers, known as members, that participates in the replication of one or more
replicated folders. A replicated folder is a folder that is kept synchronized on each member. When you enable DFS
Replication on a folder with targets, the servers that host the folder targets become members of the replication group, and the folder targets are associated
with the replicated folder. The name of the replication group matches the namespace path (Domain.com\ncctstest2\Stuff\Tools), and
the name of the replicated folder matches the folder name (Tools).
From the Replication
node, you can manage aspects of DFS Replication, such as the schedule and bandwidth usage, file and subfolder filters, and the topology (a framework of
replication paths between members). On the Replicated Folders tab in the details pane, you can also view the
namespace path that corresponds to the replicated folder, as shown in the following figure.

If you navigate back to the Tools folder in the Namespaces node, notice that the Replication
tab in the details pane shows that the Tools folder is being replicated using DFS Replication
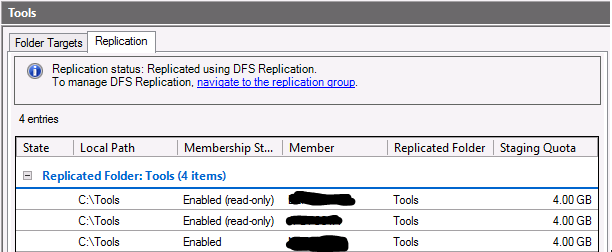
If one of the folders targets contained data when you enabled DFS Replication, you can verify that replication has completed by clicking the Folder
Targets tab, right-clicking the folder target that initially held no data, and then clicking Open in Explorer. After the initial
replication delay, the files in this folder target should match the files in the target that initially held the data.