How to set up a basic working Appium test environment
Appium is a test framework targeting devices; although it is very handy and powerful, it is not so straightforward and easy to install. Furthermore, the documentation (IMHO) does not provide a good tutorial to get things working as fast as possible. In this post, I am going to provide all that needs to set up Appium for running a basic test scenario written in C#.
What is Appium?
Appium is used to automate tests on devices with the main objective of allowing users to write tests once, and run them on different platforms and devices with no further effort. The main idea behind Appium can be easily grasped by looking at the following figure.
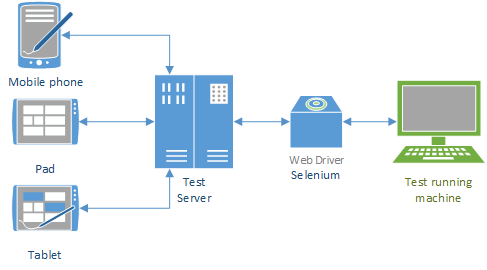
The basic workflow to test with Appium is the following:
- Tests are written using different languages (Appium supports many of them: Ruby, C# and Java to list some).
- A server running Appium (the test server) is configured and made available on a certain network location.
- Devices, or their corresponding simulators, are connected to the test server.
- Tests are run from the test machine.
Please note that in the last point I said: "tests are run from..."; this is our point of entry to understand how Appium works. The client/server pattern helps Appium achieve multi-platform testability, once a test is written it is executed in the client/test station. Thanks to Google's JSON [seleniumwebdriver], Appium is able to have tests send commands to devices through the test server.
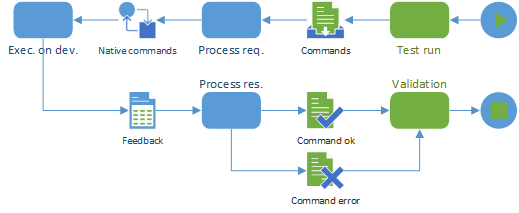
When writing Appium tests, the code will simply perform HTTP calls to the server which will translate those meta-commands into device-specific actions sent to the device to test. Commands are essentially user interactions with the app like clicking an interface component, swiping on the screen, scrolling onto a particular area or performing a specific gesture. Appium also supports execution both on real devices and simulators.
A little problem with naming
So if somebody asked us: "Where does my test run on?" we would probably find some uneasiness when replying. In fact we launch our tests from a client machine, but they actually run on our devices (or their simulators). So how to put things in order? The solution is in how we describe the process. The following statement can help:
Tests are actually run from a test client and they are executed on a device or its simulator via the test server.
Writing your first test in C#
In Appium's philosophy, a test for an app should be written only once, then it is supposed to run on different platforms with no further work.
The first thing we take care of is locating all configuration settings needed to pass to the server in order to run our tests. Appium's API consists of some important classes, one of these is DesiredCapabilities. This class defines the most important parameters to have the server run tests in the correct testing environment; in order to keep track of these settings, let's create a wrapper that we can reuse.
 public sealed class TestCapabilities {
  /// Tracking platforms
  public enum DevicePlatform {
    Undefined,
    Windows,
    IOS,
    Android
  }

  public string BrowserName      { get; set; }
  public string FwkVersion       { get; set; }
  public DevicePlatform Platform { get; set; }
  public string PlatformVersion  { get; set; }
  public string DeviceName       { get; set; }
  public string App              { get; set; }
  public bool   AutoWebView      { get; set; }
  public string AutomationName   { get; set; }

  public TestCapabilities() {
    this.BrowserName     = String.Empty;
    this.FwkVersion      = String.Empty;
    this.Platform        = DevicePlatform.Undefined;
    this.PlatformVersion = String.Empty;
    this.DeviceName      = String.Empty;
    this.App             = String.Empty;
    this.AutoWebView     = false;
    this.AutomationName  = String.Empty;
  }

  public void AssignAppiumCapabilities(ref DesiredCapabilities appiumCapabilities) {
    appiumCapabilities.SetCapability("browserName",     this.BrowserName);
    appiumCapabilities.SetCapability("appium-version",  this.FwkVersion);
    appiumCapabilities.SetCapability("platformName",    this.Platform2String(this.Platform));
    appiumCapabilities.SetCapability("platformVersion", this.PlatformVersion);
    appiumCapabilities.SetCapability("deviceName",      this.DeviceName);
    appiumCapabilities.SetCapability("autoWebview",     this.AutoWebView);

    // App push (will be covered later)
    if (this.App != String.Empty)
      appiumCapabilities.SetCapability("app", this.App);
  }

  /// Converting to string the platform (for Appium)
  private string Platform2String(DevicePlatform value) {
    switch (value) {
    case DevicePlatform.Windows:
      return "win"; /* TODO: Need to write your own extension of Appium for this */
    case DevicePlatform.IOS:
      return "iOS";
    case DevicePlatform.Android:
      return "Android";
    default:
      return "";
    }
  }
}
In the most simplistic scenario, you will run your tests against the same server. However in a more enterprise-level context, you might need to deploy more test servers depending on the tests you have. It is good practice to keep track of your servers.
 public static class TestServers {
  public static string Server1 { get { return "https://192.168.2.23:3445/wd/hub"; } }
  public static string Server2 { get { return "https://192.168.2.24:3446/wd/hub"; } }
  public static string Server3 { get { return "https://192.168.2.36:3432/wd/hub"; } }
  public static string Server4 { get { return "https://192.168.2.36:3436/wd/hub"; } }
  public static string Server5 { get { return "https://192.168.2.38:3445/wd/hub"; } }
  public static string Server6 { get { return "https://192.168.2.39:3445/wd/hub"; } }
}
First step done!
Your first test suite and all dependencies you need
Our final test is ready to be crafted now. Before writing it, however, we need to download the Selenium WebDriver for C# so that we can send commands to the Appium server using C#.
- Go to Selenium WebDriver download page and download the driver for C#.
- Unzip the folder and show its content.
- Locate the .NET version you need and copy that folder into your test project's dependency directory.
- Reference all assemblies in your project.
One more thing we need is the Appium Dot Net Driver in order to get some more tools.
- Go to Appium Dot Net Drive's page on GitHub and download it in your test client (where your test solution is located).
- Unzip the content and navigate to the "appium-net-driver" project folder.
- Open the project in Visual Studio and build it.
- Locate output assemblies (a "bin" folder should be created) and copy them into your test's project.
- Add references to these assemblies in your test solution.
Now we can get to the test suite. The code below provides a basic template to have an Appium test ready to run. Here I am not providing a specific unit test implementation, read Appium's API in order to learn how to use automation tools for that.
 namespace AppiumTests
{
  using System;
  using Microsoft.VisualStudio.TestTools.UnitTesting; /* We use .NET UnitTest Fwk, but any unit test fwk can be used */
  using AppiumTests.Helpers;
  using AppiumTest.Framework;
  using OpenQA.Selenium; /* Appium is based on Selenium, we need to include it */
  using OpenQA.Selenium.Appium; /* This is Appium */
  using OpenQA.Selenium.Appium.Interfaces; /* Not needed for commands shown here. It might be needed in single tests for automation */
  using OpenQA.Selenium.Appium.MultiTouch; /* Not needed for commands shown here. It might be needed in single tests for automation */
  using OpenQA.Selenium.Interactions; /* Not needed for commands shown here. It might be needed in single tests for automation */
  using OpenQA.Selenium.Remote;

  [TestClass]
  public class AppiumTestSuite
  {
    private AppiumDriver driver;

    private static Uri testServerAddress = new Uri(TestServers.Server1);
    private static TimeSpan INIT_TIMEOUT_SEC = TimeSpan.FromSeconds(180); /* Change this to a more reasonable value */
    private static TimeSpan IMPLICIT_TIMEOUT_SEC = TimeSpan.FromSeconds(10); /* Change this to a more reasonable value */

    [TestInitialize]
    public void BeforeAll()
    {
      DesiredCapabilities capabilities = new DesiredCapabilities();
      TestCapabilities testCapabilities = new TestCapabilities();

      testCapabilities.App = "";
      testCapabilities.AutoWebView = true;
      testCapabilities.AutomationName = "";
      testCapabilities.BrowserName = String.Empty; // Leave empty otherwise you test on browsers
      testCapabilities.DeviceName = "Needed if testing on IOS on a specific device. This will be the UDID";
      testCapabilities.FwkVersion = "1.0"; // Not really needed
      testCapabilities.Platform = TestCapabilities.DevicePlatform.Android; // Or IOS
      testCapabilities.PlatformVersion = String.Empty; // Not really needed

      testCapabilities.AssignAppiumCapabilities(ref capabilities);
      driver = new AppiumDriver(testServerAddress, capabilities, INIT_TIMEOUT_SEC);
      driver.Manage().Timeouts().ImplicitlyWait(IMPLICIT_TIMEOUT_SEC);
    }

    [TestCleanup]
    public void AfterAll()
    {
      driver.Quit(); // Always quit, if you don't, next test session will fail
    }

    ///
    /// Just a simple test to heck out Appium environment.
    ///
    [TestMethod]
    public void CheckTestEnvironment()
    {
      var context = driver.GetContext();
      Assert.IsNotNull(context);
    }
  }
}
Done! The test suite is ready to be run. As you can see I am using NUnit as unit test framework, however you can use whatever test framework you like; Appium is not affected by this and will work as expected.
Setting up an Appium test server
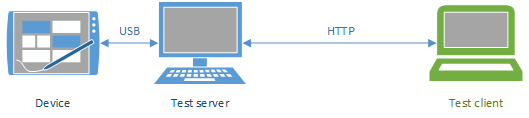
In the first part of this article I described the client/server nature of Appium; however this does not mean that you need two computers for testing your app, a standalone deployment is possible and consists of having the Appium test server installed and running on the same machine where tests will run from. Since I want to cover a generic scenario, this tutorial will consider the following architecture:
- A Windows test client.
- A Mac test server.
- One Android and one Apple tablet.
The network configuration is depicted by the following figure.
The first thing we need to do is installing the Appium server, then we will take care of devices.
Installing the Appium server
Our scenario covers Appium server on Mac, but the installation process is quite the same for Windows and Unix as well. However please take care of one important thing: the server needs to be connected to devices or run their simulators, for all platforms (Windows, iOS and Android) vendors provide different SDKs; however not all SDKs are available for all OSs, so your testing options will be limited as per the following matrix.
| Appium srv deployed on | Windows SDK(*) | iOS SDK | Android SDK |
|---|---|---|---|
| Windows | Yes | No | Yes |
| Mac OS | No | Yes | Yes |
| Unix/Linux | No | No | Yes |
(*) Appium still does not support tests on Windows: it means that tests cannot be run on Windows simulator and on Windows mobile devices; just reporting for future possible extensions.
As it is possible to see, a single server will never be able to allow tests on all possible device platforms. Another important thing to know about Appium is that it can be installed on all OSs reported in the matrix above.
To install Appium, follow these steps:
- Go to the Appium website.
- Download the latest version of the software according to your OS.
- Run the installer and complete all steps (almost no configuration).
- Once done, launch Appium and click on the gear icon on the top-left side of the screen.
- Make sure that the "Server Address" field is set to the local address "0.0.0.0" and the "Port" field next to it is st to "4723" (or set it to another valid non-used port).
And done! There is no further configuration to perform. Next step is configuring devices or their simulators. Here as well it is important to understand an important concept: either you are going to test on a real device or on its simulator, you will need that device SDK. Appium will take advantage of the SDK to connect to the simulator or the real device connected via USB. Also please be aware that I will not enter in detail for installing SDKs (off topic in this article).
Testing on iOS
Since you will run on the iOS simulator, you need to have it running before running your tests (it is not always necessary though).
- Launch XCode from your machine and open your app's project.
- Navigate to XCode -> Open Developer Tool -> iOS Simulator and bring up the simulator.
To run tests on the iOS simulator, follow these steps in the Appium server:
- On the top-left corner, click on the radio button below the Apple icon to activate Appium for Apple devices.
- Click on the Apple icon (top-left) and bring up the "iOS Settings" window.
- Check "App Path" if unchecked and enable the textbox next to it.
- Locate field "App Path" and type the absolute path to the .app file of your app. Everytime you compile your XCode project, in the "build" folder, a file called <project-name>.app is generated; you need to get that file's path.
- Be sure that field "BundleID" is unchecked.
- Since we are testing on a tablet, be sure to select "iPad" in field "Force Device". If you want to test on a different device, choose the most appropriate one for your needs.
- Be sure field "UDID" is unchecked.
You did it! The server is ready to accept incoming requests from your tests. Run your server by clicking on the top-right button "Launch". After that, switch to your test client and run your tests; as soon as they execute you will see, on the server, the iOS simulator coming up and perform all tasks.
Testing on real device
To test on a real Apple device (iPad or iPhone), do not touch the configuration you used to test on the simulator and do the following on the test server:
- Connect your device to the server machine via USB.
- Be sure to set up correct provisioning profiles for your devices. Follow Apple's documentation about provisioning profiles.
- On your app's XCode project, navigate to Windows -> Organizer and bring up the "Organizer" window.
- On the left side, locate your device under "Devices" group and select it.
- Your device details are shown. Locate field "Identifier" and copy & paste it on a note file, you will need it later.
- On the left pane, expand your device to show more options. Locate "Applications" and click on it.
- In the "Applications" window for your device, locate your app and copy & paste its BundleID for later. The BundleID is the name reported below (small font) your app's name.
- On Appium, stop the server if it's still running and click on the Apple icon (top-left) and bring up the "iOS Settings" window.
- Check the "BundleID" field and paste there the text you just saved in step 7.
- Check the "UDID" field and paste there the 160bit hex value you saved on step 5.
You're ready to go! Start the server and run you tests; this time you will see your app being deployed and running on the device.
Testing on Android
The Android SDK has a very strict virtual environment for simulating; the user must correctly install all needed libraries according to the API level and the Android system version on which the app is supposed to run. The latter is very important in those cases where your apps have a minimum requirement in terms of OS support; thus be sure, in such scenarios, to choose the correct version. Follow these steps to correctly set your AVD (Android Virtual Device):
- Open your Eclipse environment on your project.
- Refer to the Android documentation to set up you AVDs.
To run tests on the Android simulator, follow these steps on the Appium server:
- On the top-left corner, click on the radio button below the Android icon to activate Appium for Android devices.
- Click on the Android icon (top-left) and bring up the "Android Settings" window.
- Check "App Path" if unchecked and enable the textbox next to it.
- Locate field "App Path" and type the absolute path to the .apk file of your app. Everytime you compile your Eclipse project, in the "bin" folder, a file called <project-name>.apk is generated; you need to get that file's path.
- Be sure that fields "Package", "Use Browser" and "Device Name" are unchecked.
- Select the correct version for field "Platform Version" according to your Android API version.
You're done! Run the server by clicking on the top-right button "Launch". After that, switch to your test client and run your tests; as soon as they execute you will see, on the server, the Android simulator coming up and perform all tasks.
Testing on real device
To test on a real Android device, leave your configuration as it was when you set up Appium to work with the simulator and proceed as follows:
- Connect your device to the server machine via USB.
- Click on the top-left button displaying the Android icon and bring up the "Android Settings" window.
- Uncheck field "Launch AVD".
- Check field "Device Name".
- Close the Android simulator if it is still running.
This is it! When you run your tests, you will now see your app being deployed and running on your Android device.
App push from the test client
One concept is important to understand about Appium when it is configured as we did so far:
A test is bound to a single app per each server.
It means that it is not possible to set up an Appium server for testing two different apps. So: "Where is the problem?", some of you might ask; actually the problem is when we want to create a real infrastructure for testing apps in the context of real enterprise. In such a context it would be nice to set up a server for testing more than one app, however we cannot do this if we need to set the app to test at server side. Appium, however, allows developers to set the app to test from tests; it means that we can transmit the path (on the server) to the app file that should be used to deploy the app itself; only one more capability is needed: "app".
- Get back to the test suite we just wrote before, locate method GetCapabilities.
- Add one more capability as shown below.
 private DesiredCapabilities GetCapabilities() {
  // Other settings...
  capabilities.App = "<absolute-path-to-app>"; /* App-Push */

  return capabilities;
}
- Switch to the server and stop it.
- Open your device configuration (click on the top-left Apple or Android icon).
- Uncheck field "App Path".
- Start the server again.
With this simple but powerful capability, we are now able to write tests covering common base functionalities across different versions of the same app. It is also possible to use the same server to run different tests for different apps. Remember that you need to pass the absolute path to your app file (the file type changes according to the device platform) in your test server machine's filesystem, not the client.
App push + upload
I know some of you think that it would be also nice to have tests physically send the app file to the server. Appium does not support this, however nothing can stop you from using SSH or other remote connection tool to upload your app file to the server machine before running tests.
The views and opinions expressed in this blog are those of the authors and do not necessarily reflect the official policy or position of any other agency, organization, employer or company.
https://onedrive.live.com/redir?resid=28F0C4E5A0596D8%2143506